Transferring files between cloud storage platforms is a common task for both Windows and Mac users. One of the most frequent scenarios is moving photos from OneDrive to iCloud. However, this transfer process often comes with an unexpected challenge: losing the original photo creation date.
Unlike other file formats, photos contain embedded metadata—such as EXIF data, timestamps, and location tags—that can be stripped or overwritten during migration. Many Mac users have reported that after transferring photos from OneDrive to iCloud, the Created Date is replaced with the import date, making it difficult to organize and locate images chronologically.
In this guide, we'll walk you through how to transfer photos from OneDrive to iCloud without losing the Created Date, and how to restore any lost metadata if something goes wrong during the process.
Why Transferring Photos from OneDrive to iCloud Is Tricky
OneDrive (Microsoft) and iCloud (Apple) operate in separate ecosystems. There is no direct sync or transfer pathway between the two services. To move your photos, you need to use intermediary tools:
On Windows PC: Use the OneDrive app to download originals to your local drive, then upload them via iCloud for Windows.
On Mac: Use OneDrive for Mac to download originals locally, then import them into Apple Photos with iCloud Photos enabled.
While this workflow sounds straightforward, a common issue arises: macOS may overwrite the original photo creation date with the date of import, causing your timeline to become inaccurate. This is especially frustrating when dealing with hundreds or thousands of photos.
How to Transfer Photos from OneDrive to iCloud (Step-by-Step)
For Windows Users
1. Open the OneDrive app and download the original-resolution photos to your local PC.
2. Open iCloud for Windows and enable iCloud Photos. Copy the downloaded photos into the iCloud Photos upload folder. Wait for the sync to complete.
For Mac Users
1. Open OneDrive for Mac and download the original photos to a local folder.
2. Open Apple Photos and ensure iCloud Photos is turned on in Photos Settings -> iCloud.
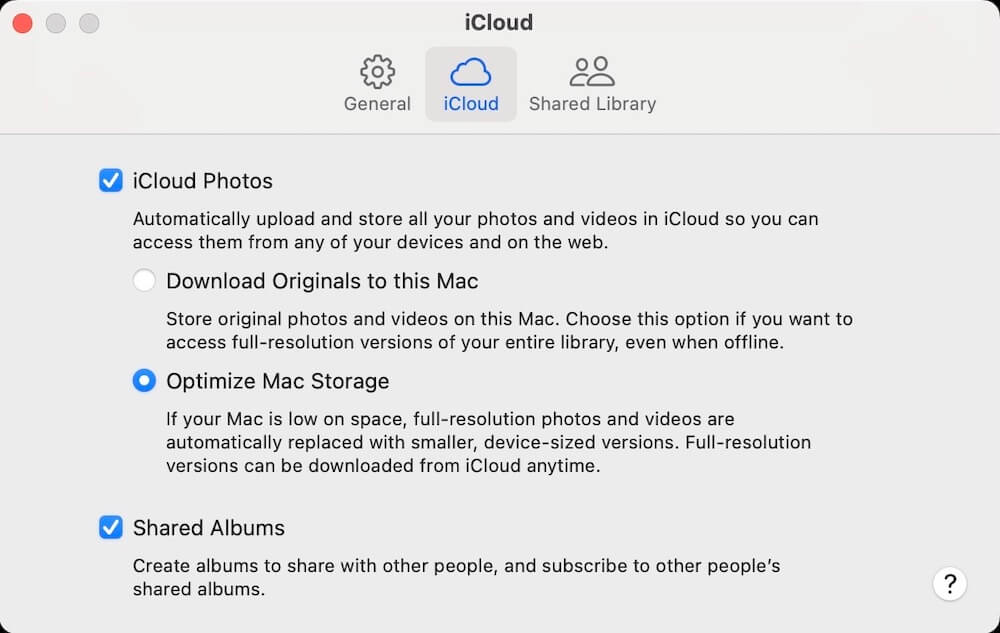
3. Import the downloaded photos into Apple Photos. They will automatically sync to iCloud. Important: If the photos show the wrong Created Date after import, follow the fix below.
How to Fix the Wrong or Missing Created Date After Transfer
When photos are downloaded from OneDrive to macOS, the original creation timestamp can be overwritten with the import date. To fix this, you can manually adjust dates in Apple Photos—but for large batches, a dedicated tool is far more efficient.
Recommended Tool: Photo Exifer
Photo Exifer is a powerful photo metadata editor for Mac that allows you to batch-restore and correct photo creation dates after transferring from OneDrive. It also supports editing EXIF, IPTC, and GPS metadata.
Option 1: Restore Created Date from EXIF Camera Date
If your photos still contain the original EXIF camera date:
1. Download and install Photo Exifer on your Mac.
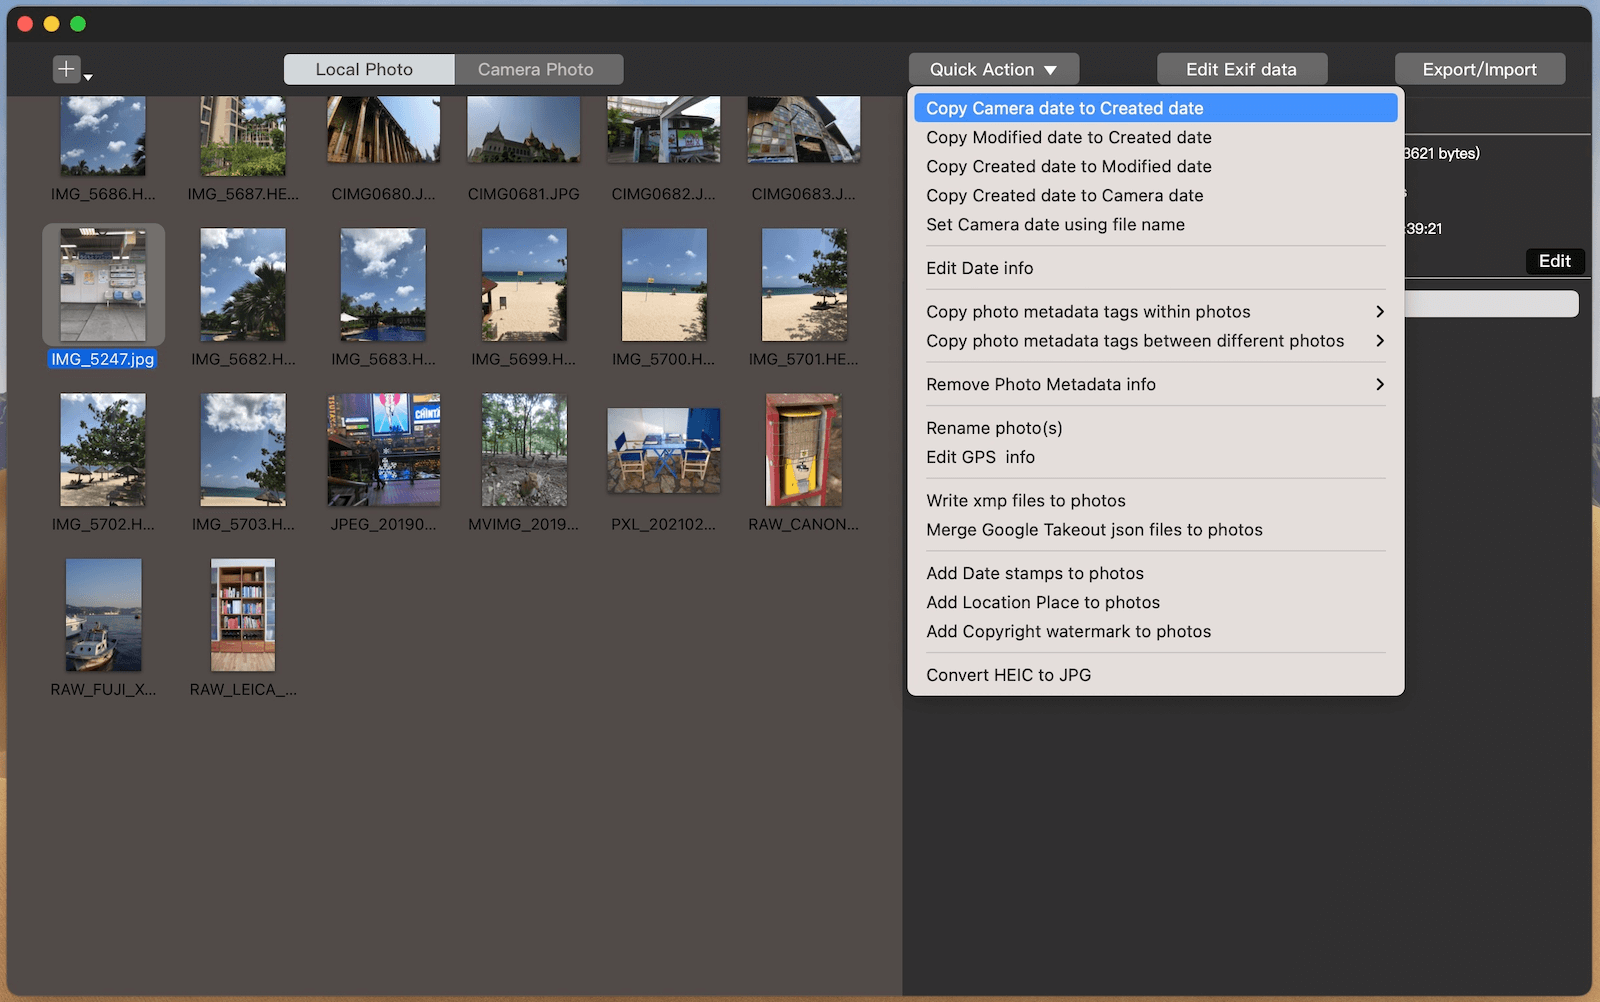
2. Import the OneDrive photos into the app. Select the photos you want to fix. Click Quick Action > Copy Photo Camera Date > Copy Camera Date to Created Date.
3. This will overwrite the incorrect Created Date with the original capture date from the EXIF data.
Option 2: Restore Date from Filename
If your photo filenames contain the capture date and time (e.g., IMG_20230101_120000.jpg):
1. Select the photos in Photo Exifer. Click Quick Action > Set Camera Date Using File Name.
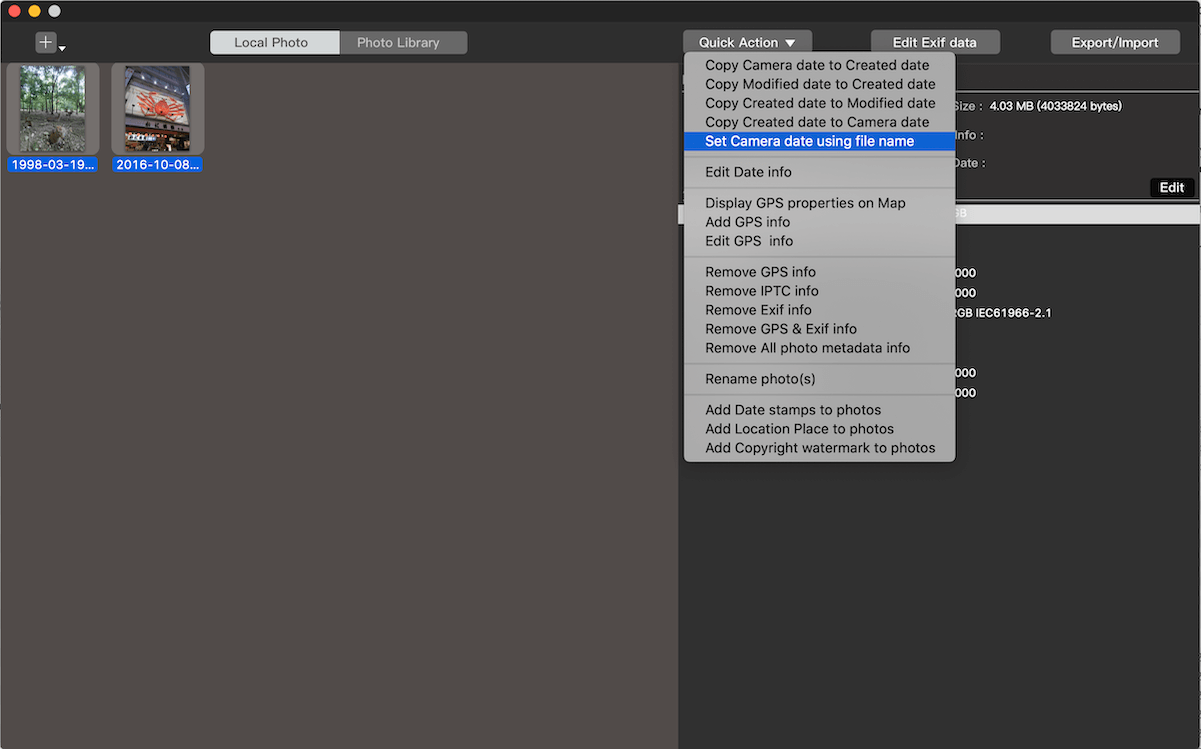
2. The app will parse the filename and apply the correct date.
Option 3: Manually Batch-Edit the Date
If your photos have no EXIF data or contain incorrect EXIF dates:
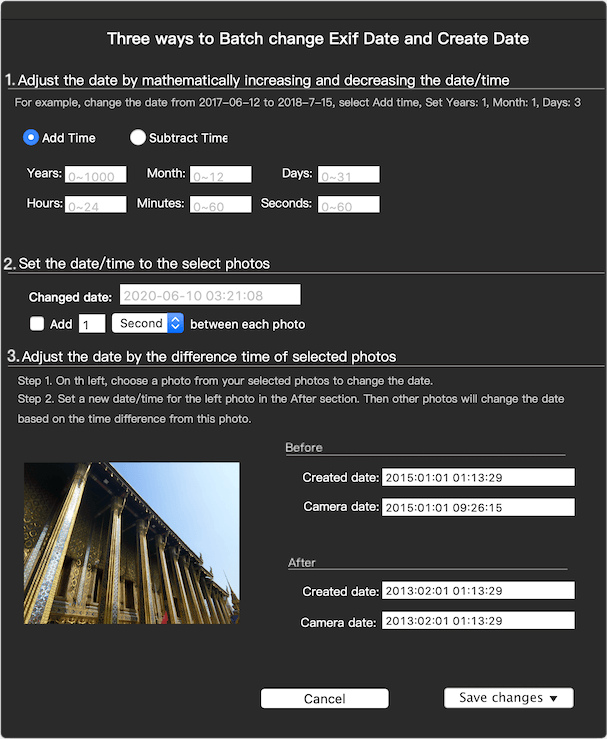
1. Select the photos in Photo Exifer. Click Quick Action > Edit Date Info.
2. Use one of the three built-in date functions to batch-adjust the capture and creation timestamps.
How to Fix Lost Photo Metadata (IPTC, GPS, Keywords, etc.)
If your photos lost additional metadata during the transfer—such as titles, keywords, captions, locations, or copyright info—Photo Exifer can restore those as well.
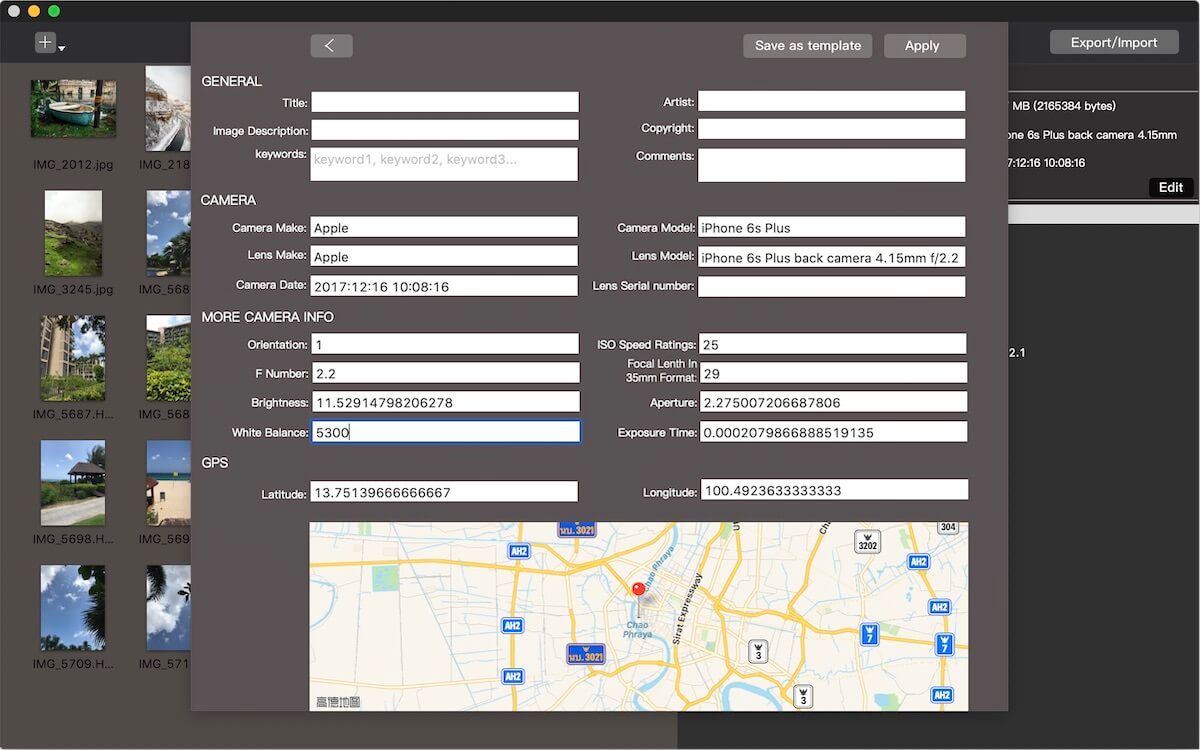
1. Import the affected OneDrive photos into Photo Exifer. Select the photos and click Edit EXIF Data.
2. Add or edit fields such as: Title, Keywords, Caption/Description, Copyright and Comments, Camera Information, GPS Location Data
3. Click Apply to save the changes.
How to Fix Dates and Metadata Directly in Your Apple Photos Library
If the incorrect photos have already been imported into Apple Photos and synced to iCloud, Photo Exifer can still help—without re-importing anything.
Step 1: Grant Full Disk Access
1. Go to System Settings > Privacy & Security > Full Disk Access.
2. Add Photo Exifer to the list and enable it. This allows the app to read and modify your Photo Library.
Step 2: Edit Dates in the Photo Library
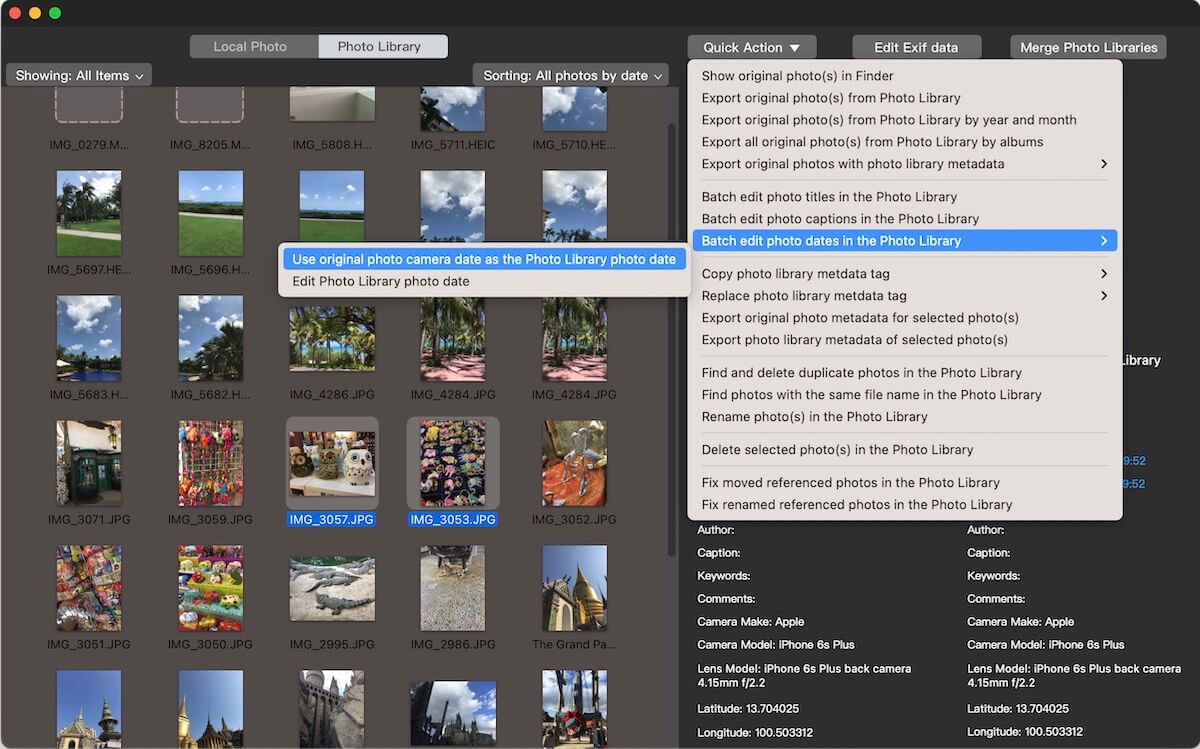
1. Open Photo Exifer and click the Photo Library tab. The app will scan all photos and videos in your library.
2. Use the Album or Date filters to locate the OneDrive photos.
3. Select the photos you want to correct. Click Quick Action > Batch Edit Photo Date in Photo Library. Choose Use Original Photo Camera Date as the Photo Library Date, or manually edit the dates.
Step 3: Edit Other Metadata in the Photo Library
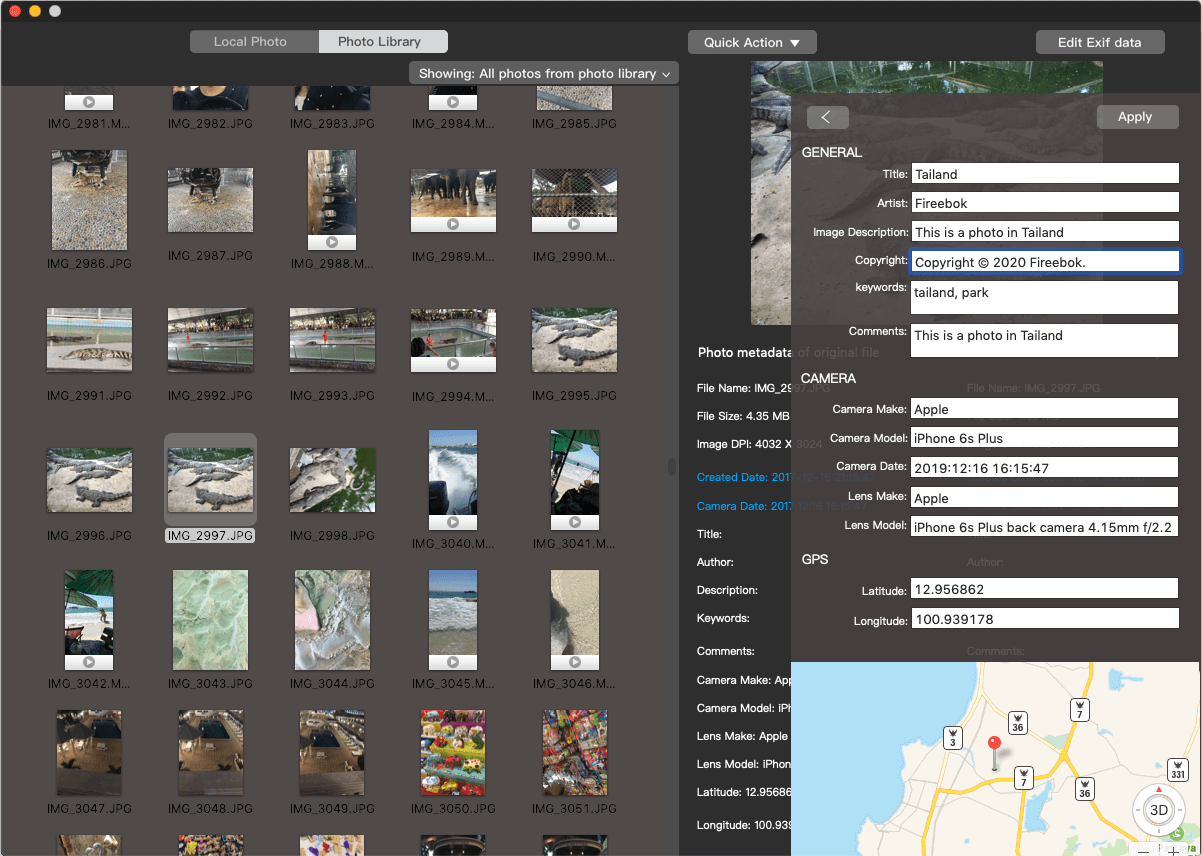
1. With the photos selected, click Edit EXIF Data -> Edit Exif date in Photo library.
2. Modify metadata such as filename, title, caption, keywords, camera info, and GPS data.
3. Click Apply to save changes directly to your iCloud-synced library.
Final Thoughts
Transferring photos from OneDrive to iCloud doesn't have to mean losing your precious metadata. By downloading originals locally and using Photo Exifer to batch-correct dates and metadata, you can ensure your photo timeline stays accurate—no matter which cloud service you use.
Whether you're a Windows or Mac user, following the steps above will help you move your photos seamlessly while keeping every detail exactly where it belongs.
| More Related Articles | ||||
 |
1. How to merge two photo libraries on Mac? 2. How to find and remove duplicate photos from Photos? |
|||
About Fireebok Studio
Our article content is to provide solutions to solve the technical issue when we are using iPhone, macOS, WhatsApp and more. If you are interested in the content, you can subscribe to us. And We also develop some high quality applications to provide fully integrated solutions to handle more complex problems. They are free trials and you can access download center to download them at any time.
| Popular Articles & Tips You May Like | ||||
 |
 |
 |
||
| Five ways to recover lost iPhone data | How to reduce WhatsApp storage on iPhone | How to Clean up Your iOS and Boost Your Device's Performance | ||