Have you accidentally deleted important photos from your Mac and discovered that they are no longer available on your iPhone or iPad either? If you use iCloud Photos to sync your photos across your iPhone, iPad, and Mac, deleting a photo on one device can also remove it from your other devices connected to the same iCloud Photos account.
This is why many iPhone and Mac users are surprised to find that their photos have suddenly disappeared from multiple devices. When those photos contain important memories or valuable information, losing them can be frustrating. Fortunately, depending on how the photos were stored and how long ago they were deleted, photo recovery on Mac may still be possible.
If you have a backup of your Mac or iPhone, restoring the deleted photos from a backup is usually the easiest and safest recovery method. However, many users don't have a recent backup. Recovering permanently deleted photos from an iPhone without a backup can be extremely difficult, while recovering deleted photos from a Mac without a backup may still be possible because deleted files can sometimes remain on the storage device until their disk space is overwritten.
In this guide, we'll explain how to recover accidentally deleted photos on Mac without a backup, including photos stored in Apple Photos and photos stored elsewhere on your Mac or an external drive.
Important: Before attempting photo recovery, check your Trash first. If the deleted photos or videos are still in Trash, they have not been permanently deleted. Simply select them and choose Put Back, or copy them to another location. The recovery methods below are intended for photos that have already been removed from Trash.
1. Where Are Photos Stored on Mac?
Before recovering deleted photos, it's important to understand where your photos are stored.
Photos Stored in Apple Photos Library
If you use the Apple Photos app to organize and manage your photos and videos, your media is normally stored inside a Photos Library package. By default, the Photos Library is located at: ~/Pictures/Photos Library.photoslibrary
The Photos Library can contain your original photos, videos, thumbnails, edits, and other library data. Many Mac users move their Photos Library to an external hard drive to save space on the Mac's internal storage. Therefore, the location of your Photos Library determines which storage device you should scan when attempting to recover deleted photos. For example:
• Photos Library on the Mac's internal drive: Scan the Mac startup disk.
• Photos Library on an external hard drive: Scan the external hard drive.
• Photos stored outside Apple Photos: Scan the drive or folder where those files were originally stored.

Photos Stored Outside Apple Photos
Not all photos on a Mac are managed by Apple Photos. You may also have photos stored in folders such as Desktop, Downloads, Documents, Pictures, or on external storage devices.
For example, photos downloaded from websites, copied from an iPhone, transferred from a camera, or manually organized into folders may exist independently of the Photos Library.
If these files have been accidentally deleted, they may also be recoverable as long as their storage space has not been overwritten.
2. How to Recover Deleted Photos on Mac
If your deleted photos are no longer in Trash and you don't have a backup, you can try using a Mac data recovery tool to scan the storage device for recoverable files.
To recover photos from an Apple Photos Library located on either the Mac's internal drive or an external hard drive, as well as photos stored outside Apple Photos, you can use Fireebok Data Recovery. It is designed to scan macOS storage devices and external drives for deleted files without requiring you to manually search through the file system.
Step 1: Download and Install Fireebok Data Recovery
Download and install Fireebok Data Recovery on your Mac.
For the best chance of recovery, avoid installing the recovery software onto the same drive where your deleted photos were stored. Continued use of the affected drive can potentially overwrite deleted data and reduce the chance of successful recovery.
Step 2: Select the Drive Where Your Photos Were Stored
Launch Fireebok Data Recovery and select the storage volume where your deleted photos were originally stored. For example:
• If your Photos Library was stored on the Mac's internal drive, select the appropriate internal volume.
• If your Photos Library was stored on an external hard drive, select that external drive.
• If your photos were stored in regular folders, select the drive containing those folders.
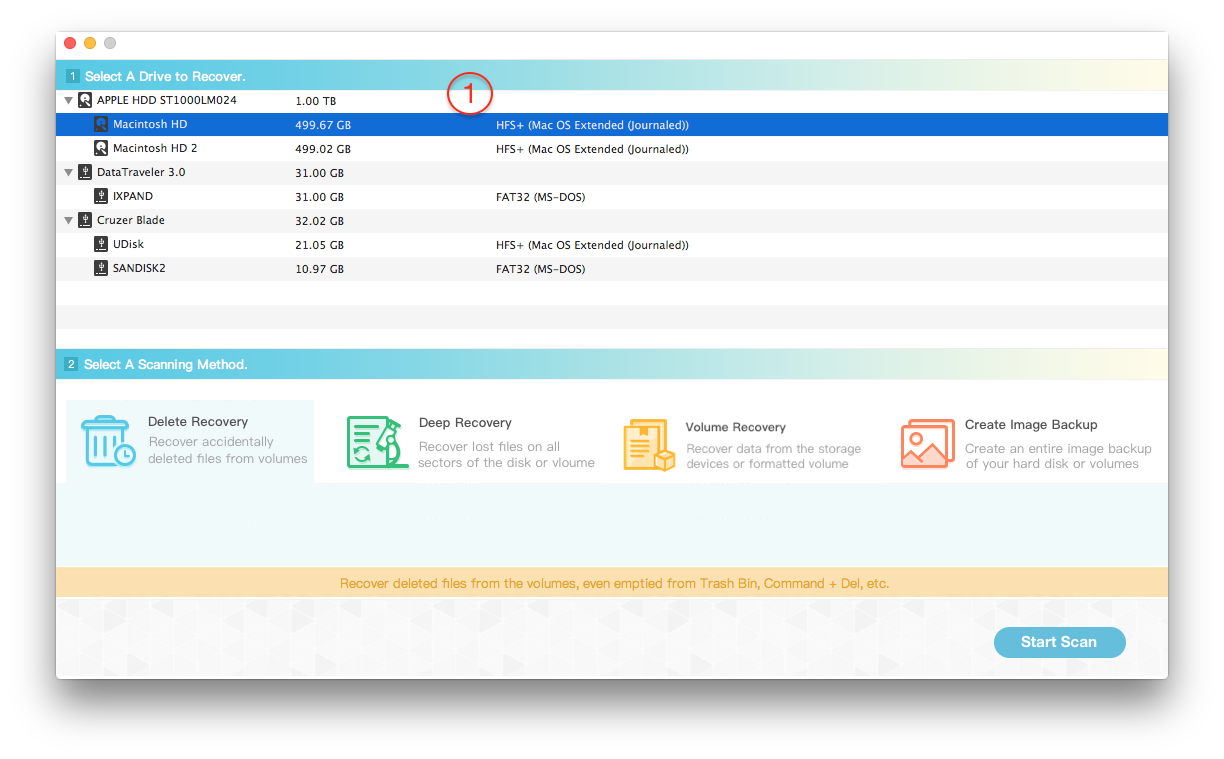
Step 3: Choose a Recovery Mode
Fireebok Data Recovery provides different scanning modes depending on the recovery situation. Choose Delete Recovery first for a faster scan. If the deleted photos cannot be found, try Deep Recovery for a more thorough scan.
Then click Start Scan to begin searching for recoverable files.
Step 4: Preview and Recover Deleted Photos
Wait for the scan to finish. Depending on the size and condition of the storage device, the scanning process may take some time.
After the scan is complete, browse the recovered files and use the preview feature to identify the photos you want to restore.
Select the photos you need and click Recover to save them to another location.
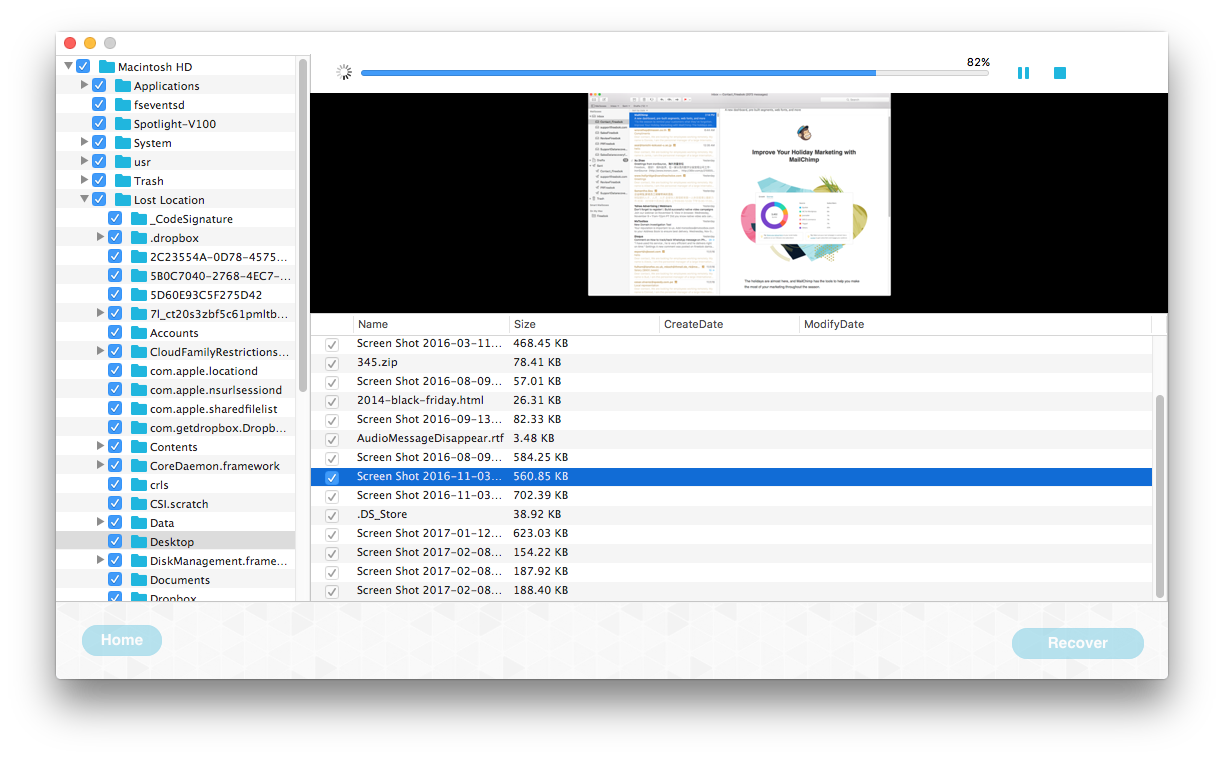
Important: We recommend saving recovered photos to a different drive or storage device whenever possible. Avoid saving recovered files back to the same drive that contained the deleted photos, as this could overwrite other recoverable data.
Can You Recover Permanently Deleted Photos on Mac Without a Backup?
Yes, permanently deleted photos on a Mac may still be recoverable without a backup, but there is no guarantee of successful recovery.
When a file is deleted, macOS may remove its reference from the file system while the underlying data remains on the storage device until that space is reused. If new data has already overwritten the deleted photo, recovery may no longer be possible.
For this reason, stop using the affected storage device as soon as possible after accidentally deleting important photos. The less new data written to the drive, the better the potential chance of recovering the deleted files.
If you use iCloud Photos, remember that deleting a photo from one synchronized device can also delete it from other devices. Before assuming that a photo is permanently lost, check Recently Deleted in Apple Photos and check your available backups.
Final Thoughts
Accidentally deleting photos from a Mac can be stressful, especially when the same photos have also disappeared from an iPhone or iPad through iCloud Photos synchronization. The first step is always to check Trash and the Recently Deleted album in Apple Photos.
If the photos have been permanently deleted and you don't have a backup, Mac data recovery software may provide another opportunity to recover them. The most important thing is to stop writing new data to the affected drive and begin the recovery process as soon as possible.
With a suitable recovery tool such as Fireebok Data Recovery, you can scan your Mac's internal storage or an external hard drive, preview potentially recoverable photos, and restore the files to another safe location.
| More Related Articles | ||||
 |
1. How to merge two photo libraries on Mac? 2. How to find and remove duplicate photos from Photos? |
|||
About Fireebok Studio
Our article content is to provide solutions to solve the technical issue when we are using iPhone, macOS, WhatsApp and more. If you are interested in the content, you can subscribe to us. And We also develop some high quality applications to provide fully integrated solutions to handle more complex problems. They are free trials and you can access download center to download them at any time.
| Popular Articles & Tips You May Like | ||||
 |
 |
 |
||
| Five ways to recover lost iPhone data | How to reduce WhatsApp storage on iPhone | How to Clean up Your iOS and Boost Your Device's Performance | ||