When trying to create backups for iPad, iPhone, or iPod touch, iTunes may say that cannot back up your data to the computer. For this problem, we have collected these warning information showed by iTunes about not being able to back up:
1. iTunes cannot back up iPhone, since the backups can’t be stored within computers;
2. iTunes cannot back up iPhone, since that it can’t start communication with iPhone;
3. iTunes cannot recover iPhone, since the failure of backing up communication;
4. Cannot copy: data error;
5. Cannot restore from this;
6. Failure of backing up communication;
7. Request rejected by iPhone.
You can solve the problem according to the steps provided by this article, and may restarting computer or iOS devices is just OK.
1. Back up your iTunes backups | 2. Update to the newest iTunes version | 3. Cut off connection with other USB devices
4. Check up your safety settings | 5. Use new account for backing up | 6. Redeploy “Lockdown” file folder
7. The reason Windows’ file system | 8. Backing up with other computers or Third party App
1. Back up your iTunes backups
Before diagnosing your problem of backing up, please make sure your latest backups have been save again as a copy. iTunes will save your copies in the following position:
Mac OS X:/Users/~/Library / Application Supports/MobileSync/Backup/
Windows XP:\Documents and Settings\ (username) \Application Data\Apple Computer\MobileSync\Backup\
Windows Vista, Windows 7 and Windows OS X:\Users\ (username) \AppData\Roaming\Apple Computer\MobileSync\Backup\
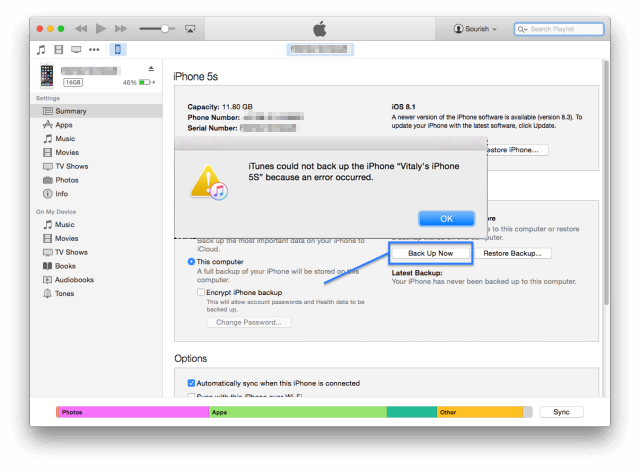
When you want to export your important contact, sms and Photos from iTunes backup to your computer. Here is the guide on how to preivew and restore from iPhone backup on Mac OS X or Windows OS.
Download Fone Rescue, and run it. Select your iTunes backup and Click start Scan


Preview all your backup files and select them to save them on your private folder
2. Update to the newest iTunes version
Update to the latest iTunes version, and meanwhile update the system of your computer (Operating System) can help solve the backup problems.
when you want to check that if your computer is of the newest system, please conduct like the following:
As for Mac, choose the “software update” from the Apple menu and all the accessible update. And if one certain update requires restart, just restart your device and then check the update. When you want to acquire the latest update for Windows PC, please visit the Microsoft Windows Update website. And if one certain update requires restart, just restart your device and then check the update.
When you want to check that if the newest version of iTunes have been applied to device, please switch on your iTunes, then check if there are some updates.
Mac: choose iTunes > check update;
Windows: choose help > check update;
3. Cut off connection with other USB devices
USB devices may disturb the communication between the iTunes and iOS devices. And please conduct the following steps to solve these other problems by USB devices:
1. Cut off all the cable connections of USB devices (like concentrator, printer, scanner, card reader, camera and so on).
2. Only connect your keyboard and mouse, if you use portable computer, please use the built-in keyboard and touch board.
3. Connect directly your devices to computer using the white Apple 3.0 needle base interface cable attached to the iOS devices. If the dependent display have USB connection, please cut off the connection with all USB devices. And please do not connect to the frontal USB port, instead, you should connect directly to the USB 2.0 port onto its back.
4. If you use the iOS equipment base, please cut off all the USB connection with the base and connect the data cable directly to the iOS devices.
5. Restart the computer.
6. Start the iTunes and try back up.
If problems still exist, and you use the virtual software for operation meanwhile you run another OS, please exit this software and restart your computer. Some OS virtualization software can create virtual USB port, which may lead to backup problems.
4. Check up your safety settings
Most of the update problems are caused by safety software or firewall’s time-exceeding or deposition failure. Stop using safety software may not switch off the safety process that intervene backups. If the safety software of the newest version haven’t yet support the newest version of iTunes, maybe you should temporarily uninstall the third-part safety software thus the iOS devices can be backed up. After backing up and synchronizing the iOS devices, please re-install and setting compatible software.
You MUST update the software not developed by Apple(i.e. the third-part software) and practical programs to the newest version and deploy them in a right way thus you can protect your computer, and meanwhile have iTunes communicate with iOS.
5. Use new account for backing up
Create a new account in your computer, and try log in with the new account and do the backups. After create new account, please withdraw the former account and log in with the new account, then switch on iTunes and do the backups, and check is this problem still exists in this new account.
If you can’t make sure how to create a new account, please carry out the following steps:
Mac OS X
1.choose “system preference settings” from the Apple menu;
2.Choose reveal > account;
3.Click “add an account” button(maybe it can make a difference only when configuration is in demand);
4.Assign a name and short name for the new account, and input passwords;
5.Choose “allow user manage this computer” blank, which will enable this account with the identity of administrator;
6.Click “create a new account”.
Windows OS
1.choose the “panel control” from the “start”menu;
2.Windows XP: open “users account”. Vista/Windows 7/10: open the “add or delete users account”( if you use the “classical view” of the Vista, please open “users account ” and open “manage other account”);
3.Choose “create a new account”, then finish the account setting procedures according to operation explanation(you MUST setting this new account as the administrator);
4.After create new account, choose “withdraw” from the “start menu”;
5.Log in the new created account;
If backups are made in the new account, the reason of problems maybe:
The original account is not the administrator account;
Time-exceeding or wrongly deployed safety software are effective in the original account, however ineffective in new administrator account. So please solve the conflict with safety software(anti-virus software);
There is something wrong with the original backups. Re-log in the original account, and re-name the “Backups” file folders. Then start iTunes and try again to back up. Do not use the “preference settings” of iTunes to delete backups unless you have made sure that backups had been done.
6. Redeploy “Lockdown” file folder
Redeploying “Lockdown” file folder can solve problems related to starting or saving backups. If backups can be made in new user, please do not redeploy this file folder. Problems related to “Lockdown” file folders will appear in all users, and they are not for some certain users. Please redeploy “Lockdown” file folder according to the following steps.
Mac OS X:
1. Cut off all connections between iOS devices and computer, and withdraw iTunes;
2. Choose “go” > “go to file folders” in “Finder” menu;
3. Input the following contents and then print “Return” button:/var/db/lockdown;
4. Now the Finder window should appear one or some files with a name that combined with long characters and numbers;
5. Choose “edit” > “choose all” in “Finder” menu. Then choose “file” > “throw into the wast”. If it reminds that “input administrator passwords”, just do it.
Note: please DO NOT delete the “Lockdown” file folder itself. Just only delete the files contained within the “Lockdown” folder;
6. Reconnect your iOS devices and switch on your iTunes.
Windows XP:
1.Cut off all connections between iOS devices and computer, and withdraw iTunes;
2.Click “my computer” in the “start” menu;
3.In the file browser window, choose “tools” > “file folder options” , then click “check” tag and alter “conceal file and file folders” option with “display all files and file folders”;
4.Click “sure”;
5.Navigate to the following file folders in your computer: (please keep in mind that the driver numbers may be different from the drivers drived by windows)
C:\Documents and Settings\All Users\Application Data\Apple 6.Move the “Lockdown” file folders to “recycle bin”;
7.Reconnect your iOS devices and switch on iTunes.
Windows Vista, Windows 7, Windows 8 and Windows 10: 1.Cut off all connections between iOS devices and computer, and withdraw iTunes;
2.Open “computer” from the “start” menu;
3.In file browser window, choose “organization” > “file folder and search” option, then click “check” tag, and alter “conceal file and file folders” option with “display all files and file folders”;
4.Click “sure”;
5.Navigate to the following file folders in your computer: C:\ProgramData\Apple;
6.Move the “Lockdown” file folders to “recycle bin”;
7.Reconnect your iOS devices and switch on iTunes.
7. The reason Windows’ file system
When using iTunes for backing up, if your iOS devices appear the following: “iTunes failed to back up iPod of XXX type, since it cannot be connected to the computer ”, this is because your Windows system partition is FAT32, which causes that no more files can be written in.
FAT supports no less than 65536 files in a single content, however, because the the file names all consist of 39 characters when iTunes make backups, which leads to the problem that no more files could be written in when the amount of them reaches about 1680. You just need to convert system partition into NTFS by nondestructive transformation.
And the transforming instruction under Windows are like this: click “start” > “run” > input “convert c : /fs : ntfs ”, and then click “enter” button onto the keyboard. Also, you can click “start” > “all programs” > “accessories” > “command indicator”, then input “ convert c: /fs:ntfs ”. Please KEEP IN MIND that the system partition needs enough remaining memory space, which are generally no less than 3 GB, and these backups cannot change position, and if you use Windows 7 system, you will not be caught in this problem, because Windows 7 can only install NTFS system partition.
8. Backing up with other computers or Third party App
If you have conducted all those above and cannot solve the problems, please try to back up with other computers.
1. Make sure that the computer you are using is in good connection with Internet, and the newest version of iTunes have been installed, moreover, all USB devices except for keyboard have been cut off with the data cable;
2. Start iTunes;
3. Connect iTunes devices directly to the USB 2.0 port onto the back of computer;
4. iOS device is shown on the source list, click it by right-hand button, and then choose “backup”;
5. If backups could be made with other computers, it means that the problems has been isolated in the original computer, instead of the iOS devices;
And if the problems exist in iOS devices, they could be made an backup through the third party app:
Download iPhone backup tool below to have a try. Note: Choose the right version for your computer.
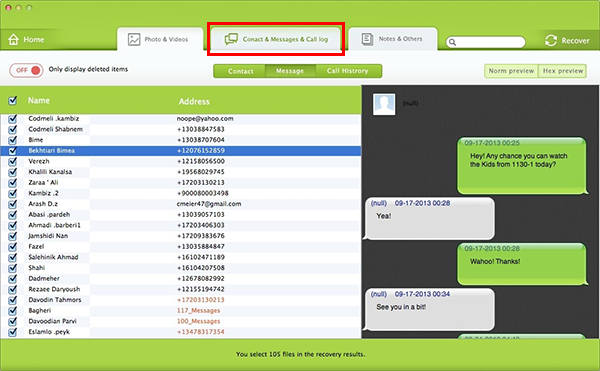
Step 1: Launch the program and connect your iPhone to computer.
Choose "Recover from iOS Device" and it will scan your iPhone automatically. This process may take some time, please be patient.

Step 2: Preview and restore iPhones data
After scanning, you will find all found data will be showed below. You can choose any tab to preview the detailed of your data.

Finally, sync recovered files to your device
1. Photos/Videos: Sync to your iPhone with iTunes;
2. Contacts: Open up Address Book which will sync your contacts automatically, then sync with iTunes;
3. Notes: Enable Notes for an email account, then sync with Notes app. (requires OS X 10.8 Mountain Lion), click here learn more;
4. Other data can only be saved on your computer.
About Fireebok Studio
Our article content is to provide solutions to solve the technical issue when we are using iPhone, macOS, WhatsApp and more. If you are interested in the content, you can subscribe to us. And We also develop some high quality applications to provide fully integrated solutions to handle more complex problems. They are free trials and you can access download center to download them at any time.
Articles you may be interested in:
How to Delete Purchased App Store History on iPhone?
How to Clean up Your iOS and Boost Your Device's Performance?
How to Reclaim Storage Space Taken By Apps on an iPhone?