A guide about how to use Photo Exifer
Fireebok Photo Exifer is a practical macOS application that allows you to add, edit and remove photo meta data including exif, tiff, iptc and gps information and supports batch operation. It supports the photos from local computer, photo library, iOS device, camera device. First download and install Fireebok Photo Exifer demo version on your computer.

- Fireebok Photo Exifer
Batch Edit the Exif Data, GPS data and other metadata of photos
For Mac OS X

When you open .dmg file, please drag & drop Photo Exifer.app to /Applications to complete the installation.
Note: The guide will show you how to change the date of photo, add date stamp on photo, edit and remove exif data, add and edit gps data, batch process metadata and more.
Part 1: Remove exif, gps, iptc and other metadata.
Part 2: Edit the Exif data and copyright information of the photo
Part 3: Copy Exif data and other photo metadata within and between photos
Part 4: Edit all metadata tags by exporting and importing metadata plist
Part 5: Change the date information of your photo
Part 6: Add the date/time stamp on the photo
Part 7: Add and edit GPS information to your photo
Part 8: Import and Edit photos from Camera device and iPhone
Part 9: Clear the photos on the left for the new start
Part 10: Show original photos of photo library in Finder
Part 11: Export photos from photo library with photo metadata
Part 12: Export photo metadata of photos in photo library
Part 13: How to Edit photo metadata in Photo Library?
Part 14: Quickly change photo metadata in Photo Library in bulk
Part 15: How to find and remove duplicate photos from Photo Library?
Part 16: How to rebuild links to referenced files in Photo Library?
Part 1: Remove exif, gps, iptc and other metadata.
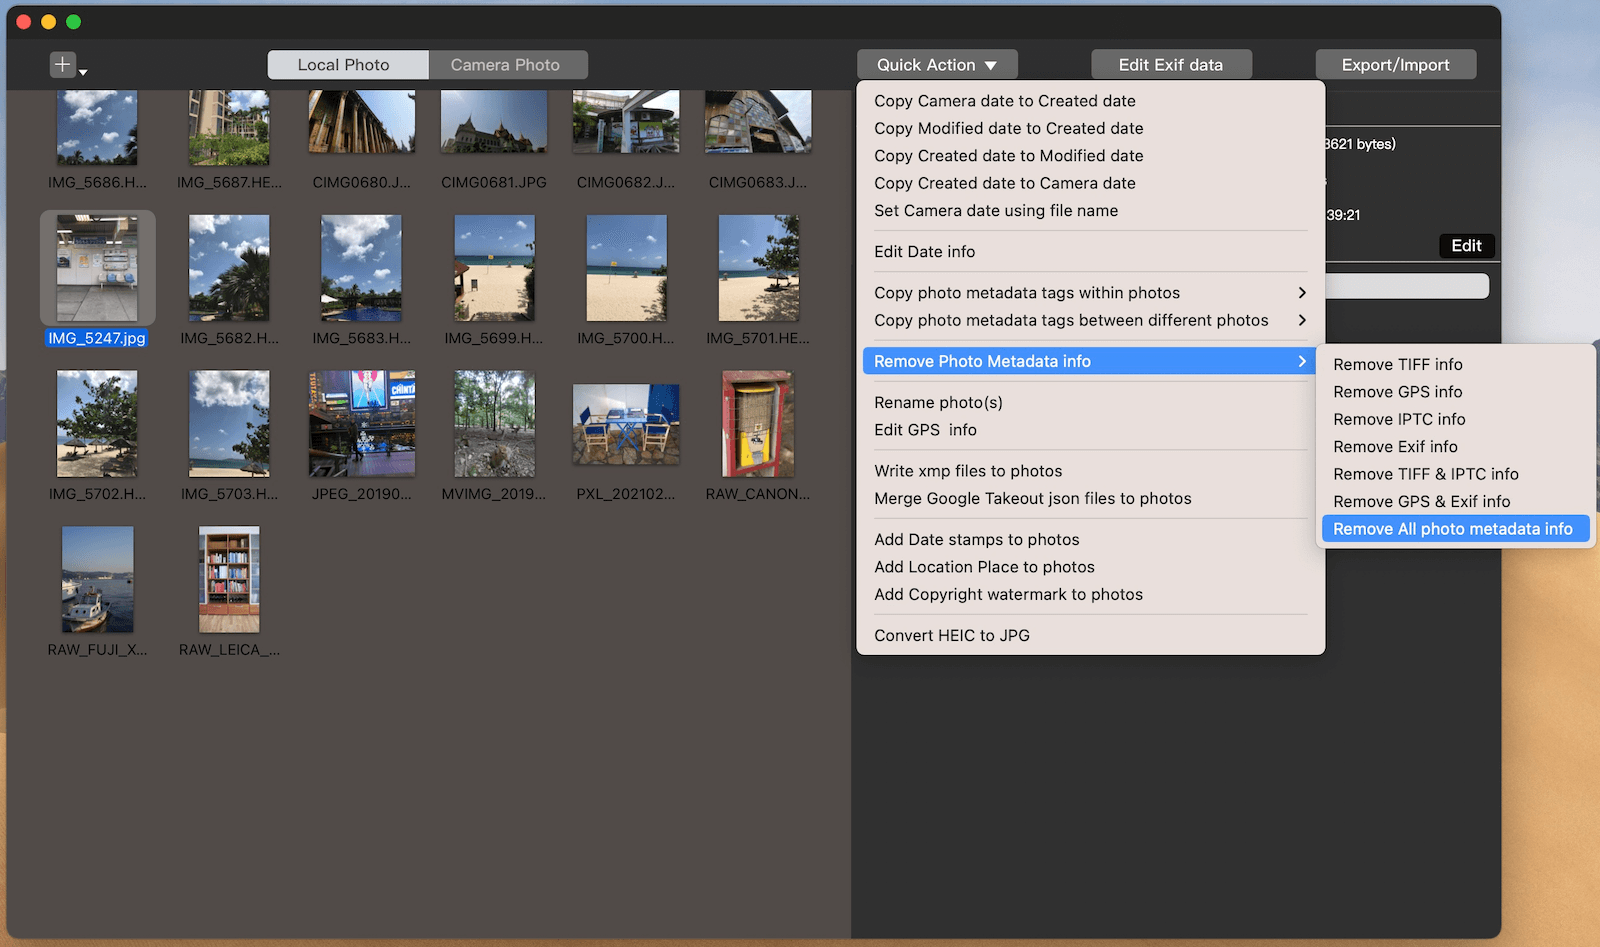
A digital camera records a lot of information, such as the location of the photo, camera mode and more. If you worry about the privacy of photos, Photo Exifer will help you to remove these metadata information from photos.
First, run Photo Exifer on your computer and import the photos from the computer or connect your iPhone and camera. Choose the photos that you want to remove the metadata, and click the Quick Action button. It will pop-up the menu to remove the exif data, tiff data, gps data, iptc data and more.
Part 2: Edit the Exif data and copyright information of the photo
Photo Exifer can edit the exif data and copyright information of the photo, it supports the artist tag, image Description tag, Copyright tag, keywords tag, user comments tag and more.
Selected photos on the left window, and click "Edi Exif data" button. It will display the edit window on the right, then you can edit the general information, camera information and gps information. After the information has changed over, click "Apply" button to save.
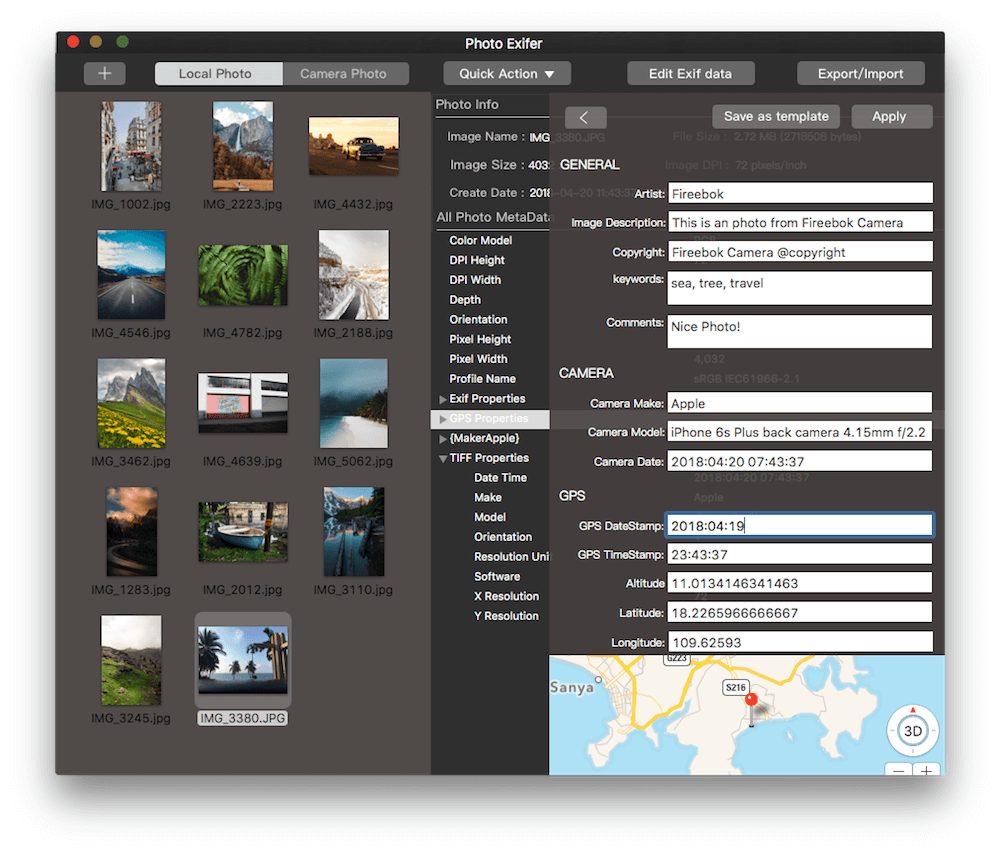
If you need to keep many photos with the same copyright information and exif data, you can save the information with a template file with "Save as template" button. Then use "Export/Import" function to import the template files to the other photos in next time.
Part 3: Copy Exif data and other photo metadata within and between photos
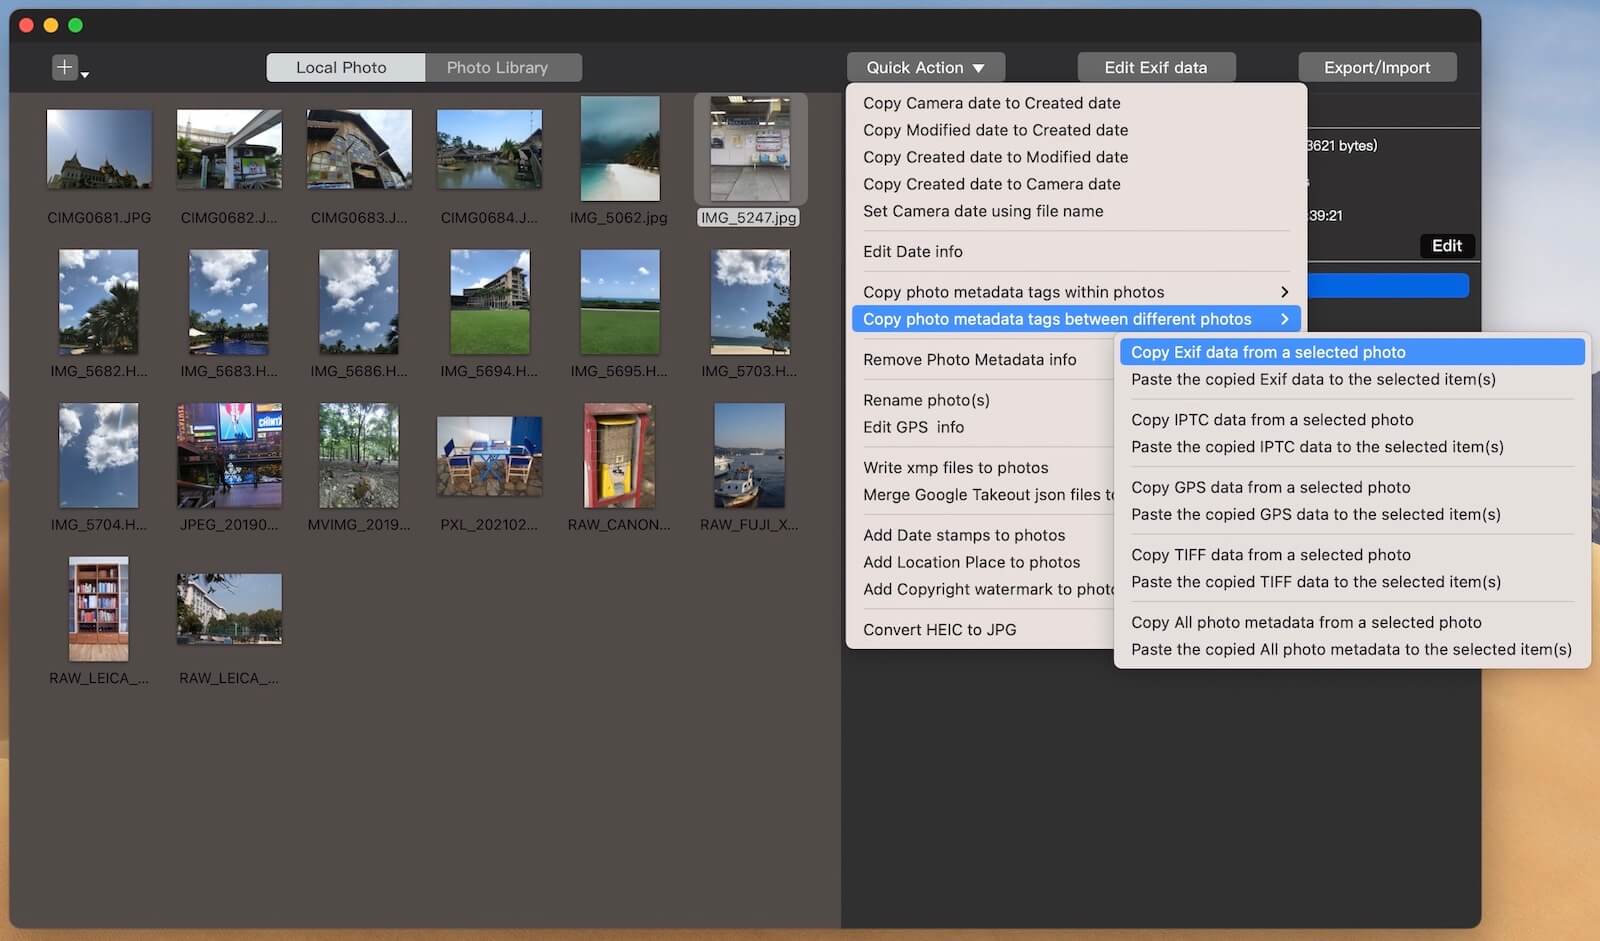
Photo Exifer support copying Exif data and other photo metadata tags within selected photos, and copying and pasting Exif data and other photo metadata tags for different selected photos.
Selected photos on the left window, and click "Quick Action" button. click the "Copy photo metadata tags within photos" menu item if you want to make changes within selected photos. You can choose "Copy photo caption to photo title", "Copy photo title to photo caption", "Copy photo camera date to photo title", "Copy photo file name to photo title", "Copy photo title to photo file name", "Copy Tiff data to Exif data", "Copy IPTC data to Exif data", "Copy Exif data to IPTC data", "Copy Exif data to TIFF data" menu item.

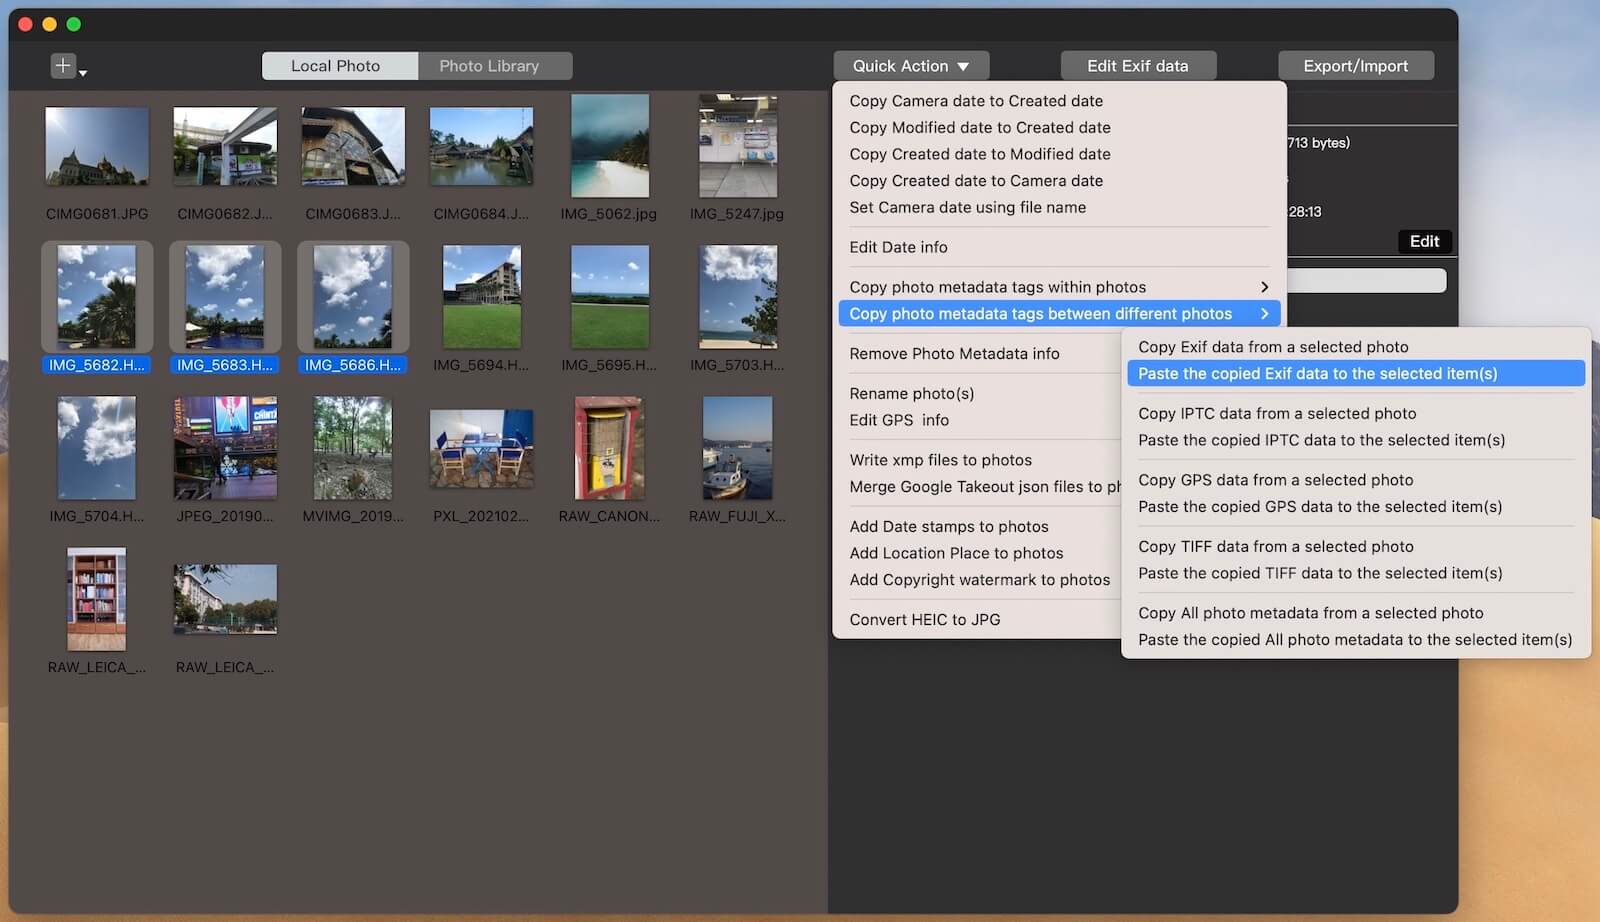
And then select other photo(s) which you want to make changes, and click "Quick Action" button, choose the "Copy photo metadata tags between different photos" menu item, and select "Paste the copyied Exif data to the selected item(s)". Alternatively, you can select aother different photo metadata tag to copy and paste under the menu item.
And then select other photo(s) which you want to make changes, and click "Quick Action" button, choose the "Copy photo metadata tags between different photos" menu item, and select "Paste the copyied Exif data to the selected item(s)". Alternatively, you can select aother different photo metadata tag to copy and paste under the menu item.
Part 4: Edit all metadata tags by exporting and importing metadata plist
Some common metadata tags that you can edit them in Edit Exif data feature. If you need to edit other uncommon metadata tags that not list in the Edit Exif data, such as some RAW photo metadata(Canon metadata tags, DNG metadata tags and more). Photo Exifer provides the Export/Import feature to allow you to add, edit all metadata tags.
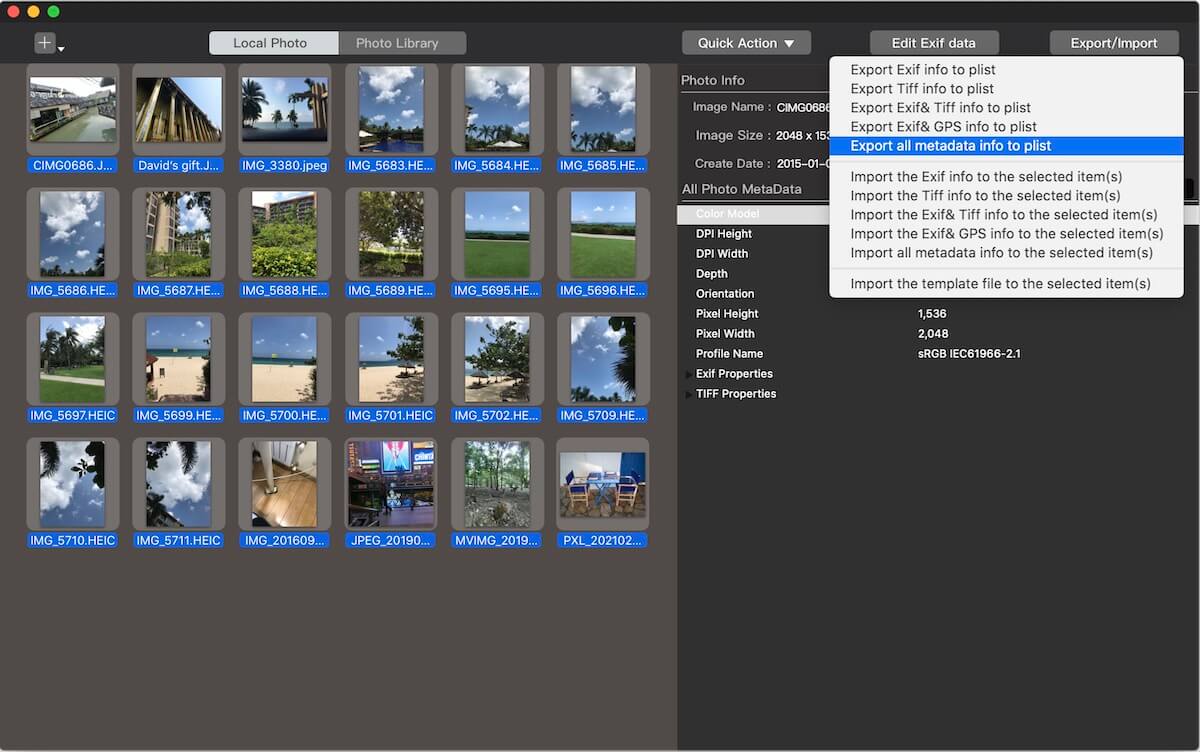
a. First select a photo in Photo Exifer, and click "Export/Import” button -> choose Export all metadata info to plist, and you will see a plist in the saved folder.
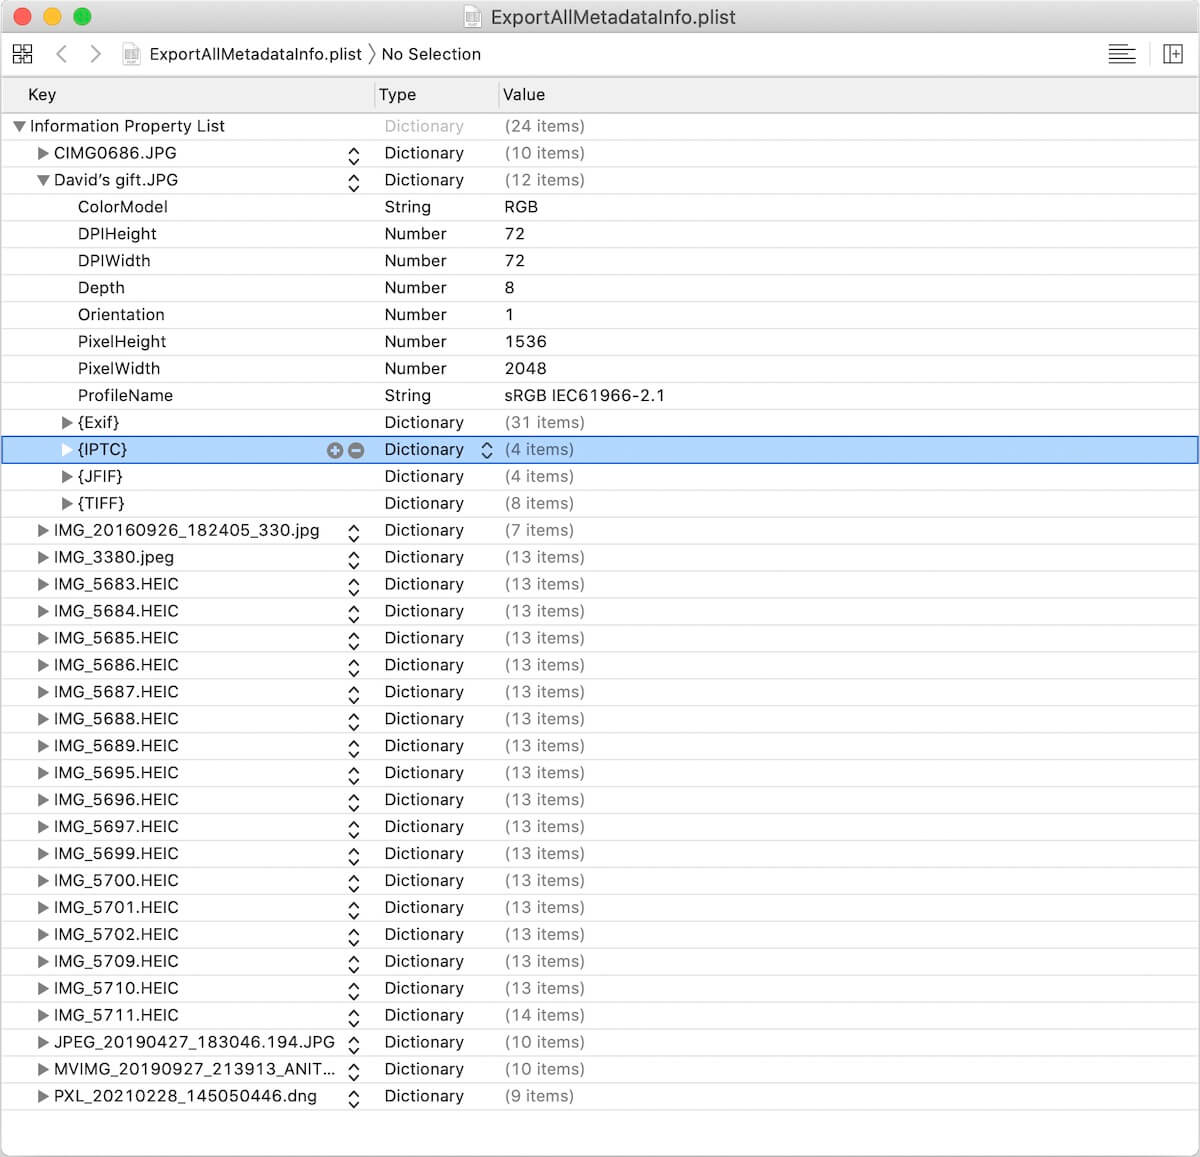
b. Open the plist file, and edit metadata tags that you want to change, add, delete, then save the plist file. If you need more information about each photo metadata tag and photo metadata, please look up all photo metadata tags here.
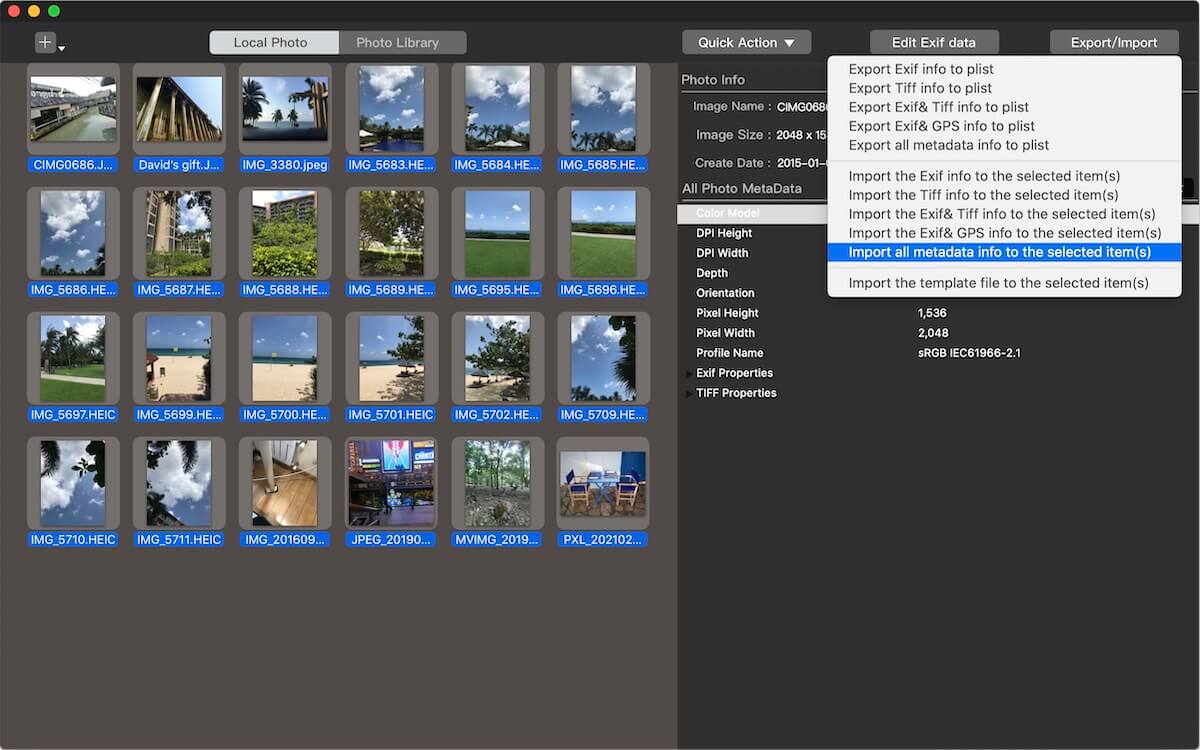
c. Select photos you want to apply the changed plist metadata in Photo Exifer, and click "Export/Import” button -> "Import all metadata info to the selected item(s)", and open the saved plist file. It will done.
Part 5: Change the date information of your photo
Sometimes when you take photos with a camera, but the date of all photos are not right. Or the created date is different from the original date of photo on the computer. In order to better manage these photos, you need to modify those date information. Photo Exifer can deal with this problem more better. It just need one click to complete the operation.
Choose the photos that you want to modify the created date to the original date, and click the Quick Action button, then choose the "Copy exif date to the create date" menu item.
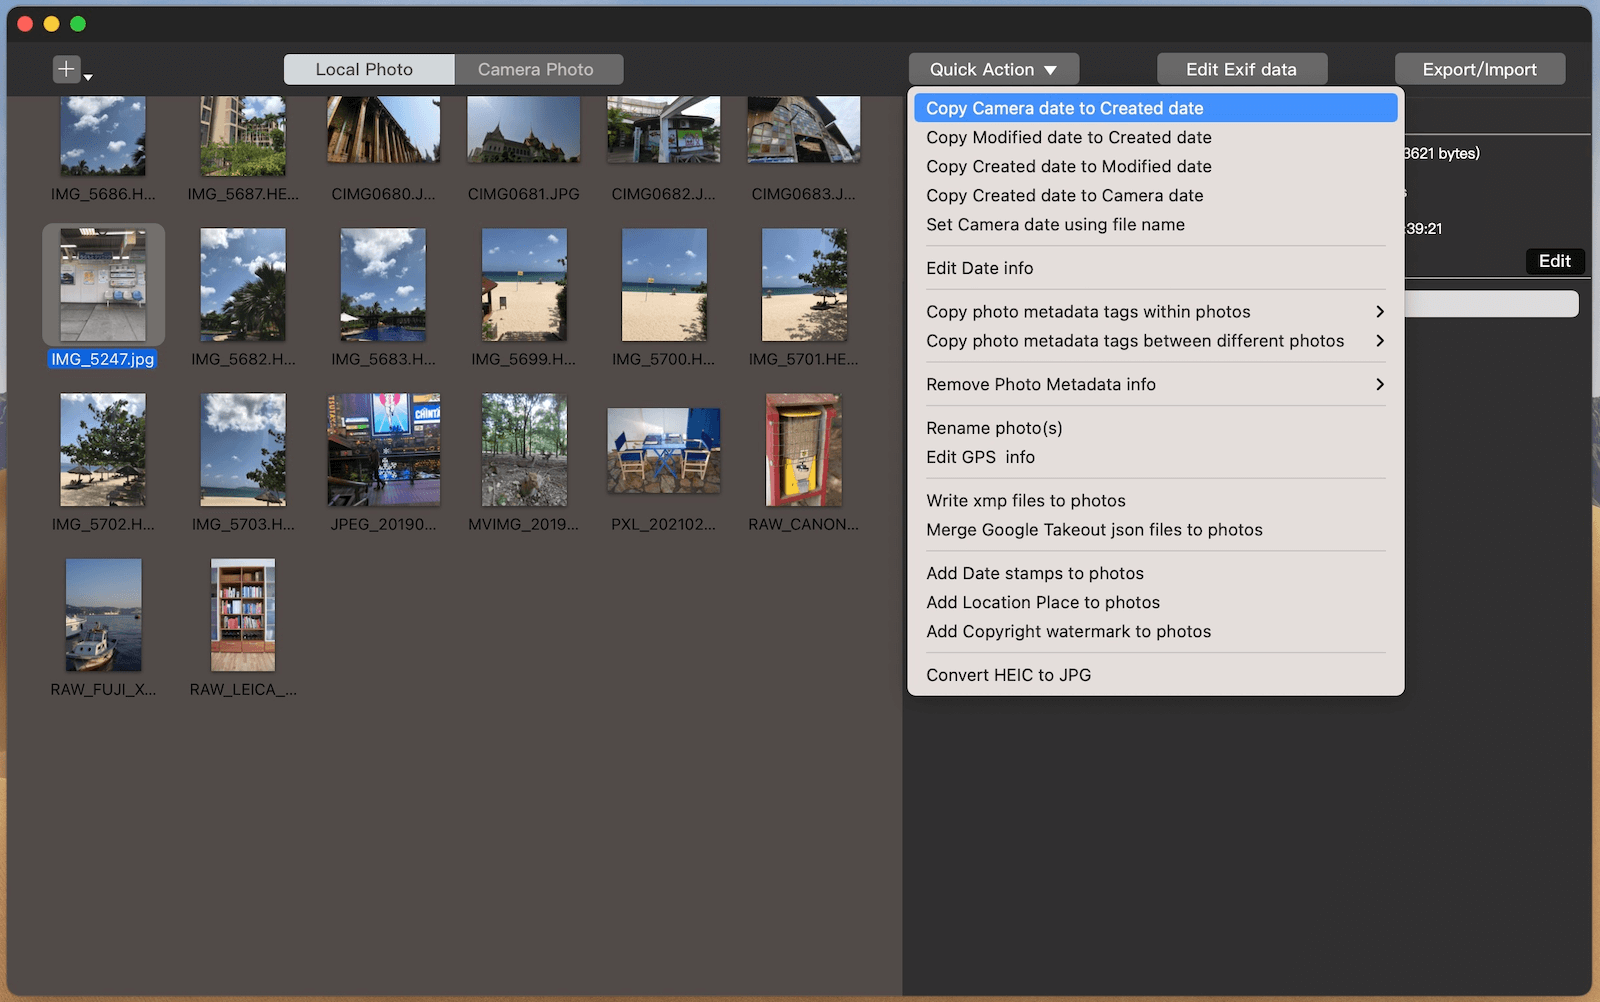
If you want to change the original date of photo, choose the "Edit date info" menu item. It will pop-up the change date window. It provides two ways to change the camera date information.
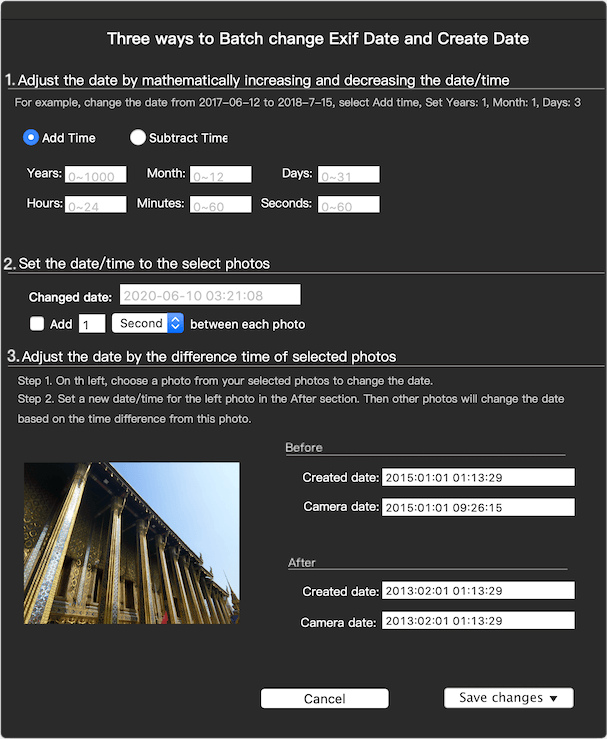
solution 1:
You can use this function to add or subtract time intervals to the selected photos, such as years, months, days, hours and more. And you need to calculate the difference between the source date and the target date. Then set the difference value to Years, Months, Days, Hours, Minutes, Seconds.
With solution 2:
The function is to set the same date/time to the all selected photos.
With solution 3:
This feature is suitable for processing a large number of photos in the same time interval. If you take a lot of photos on the trip, the dates of all the photos are not correct. This feature will solve this problem perfectly.
1. Import all your travel photos into Photo Exifer
2. Select left photos to batch change date, click the Quick Action button, then choose the "Edit date info" menu item.
3. Choose a photo which you remember the real shoot date from the selected photos on the left
4. Reset the real time in the After section, then other selected photos will change the date based on the time difference from this photo.
5. Click Save changes
that you remember the real date to reset the date. The other selected photos will change the date based on the time difference from the photo.
Part 6: Add the date/time stamp on the photo
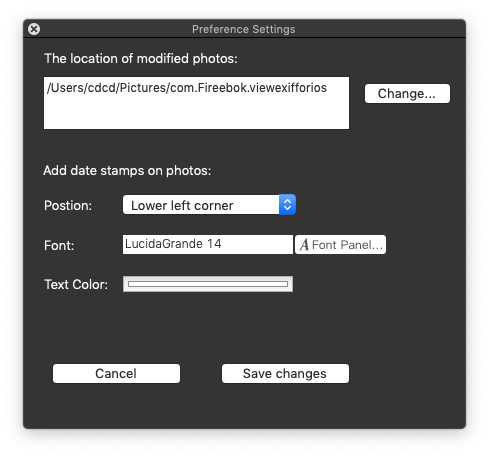
Select the exported photos on the left window, and access the preference window to set the font, font color and position of the date stamp text on photo.
Click the Quick Action button, then choose the "Add date stamps on photo" menu item.
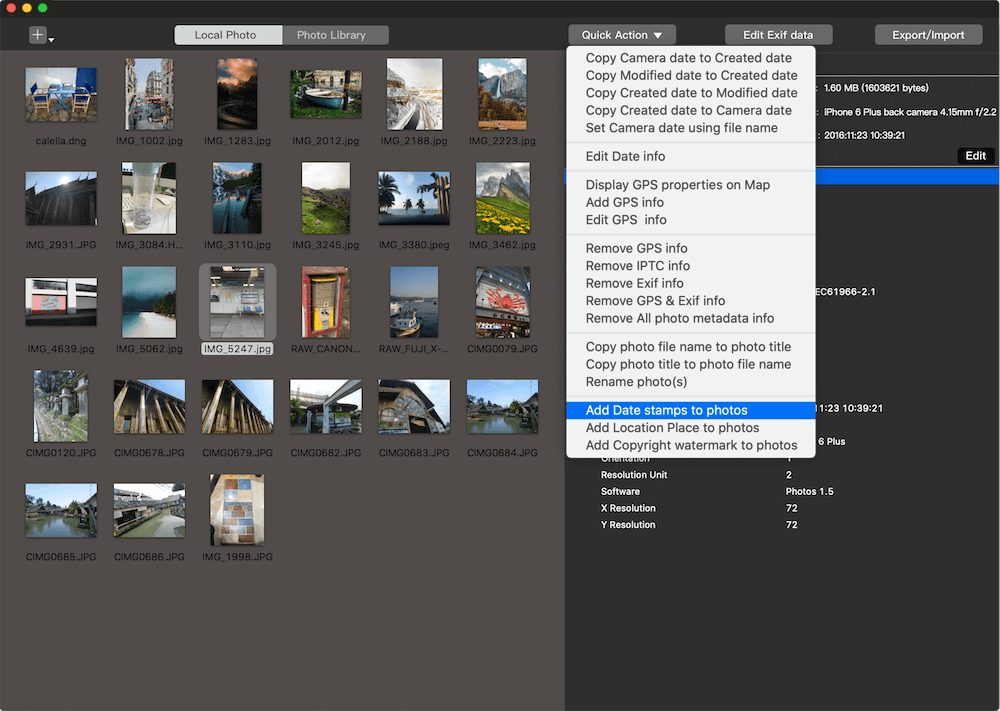
Then selected photos will be add the date stamp.
Part 7: Add and edit GPS information to your photo
Most of the photos taken by the digital camera does not contain GPS information. If you want to add the location tag where did the photo shoot? Photo Exifer supports to add a GPS information to the photos. After importing the photos to Photo Exifer, selected the photos and click the Quick Action button , then choose "Add GPS info" or "Edit GPS info" menu.
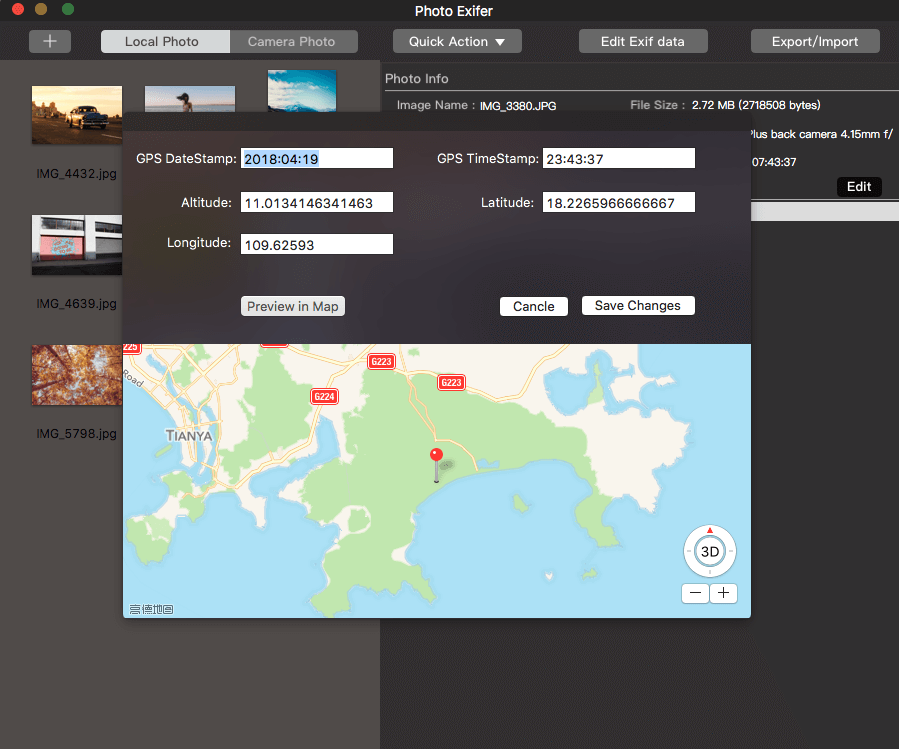
It will pop-up the gps window, you need to input the data of the altitude, latitude and longitude, you can preview the gps location with "preview in Map" before saving the information.
Part 8: Import and Edit photos from Camera device and iPhone
Photo Exifer supports the photos from iPhone device, Camera and local computer. It support many photo types including the raw photo format including: ORF, ARW, 3FR, RW2, DNG, RAF, MRW, PEF, CRW, SRF, SR2, SRW, NEF, RAW, DCR and more. When you connect the iPhone device and camera with the USB cable, and Go to product menu -> Tools -> click the “Import photos from camera device” menu item. It will pop-up the camera window, then click "Open Device" button to access the camera photo.
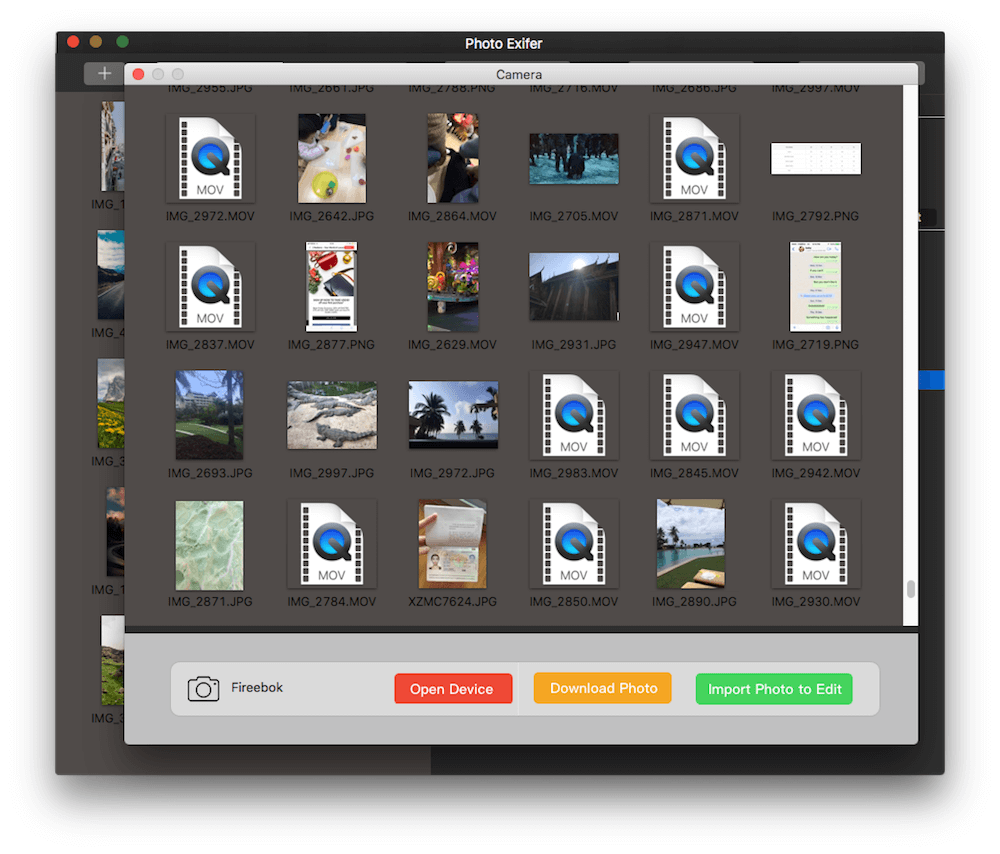
Then it will display all photos of the camera, you can download photos from the camera or import the camera photos to Photo Exifer.
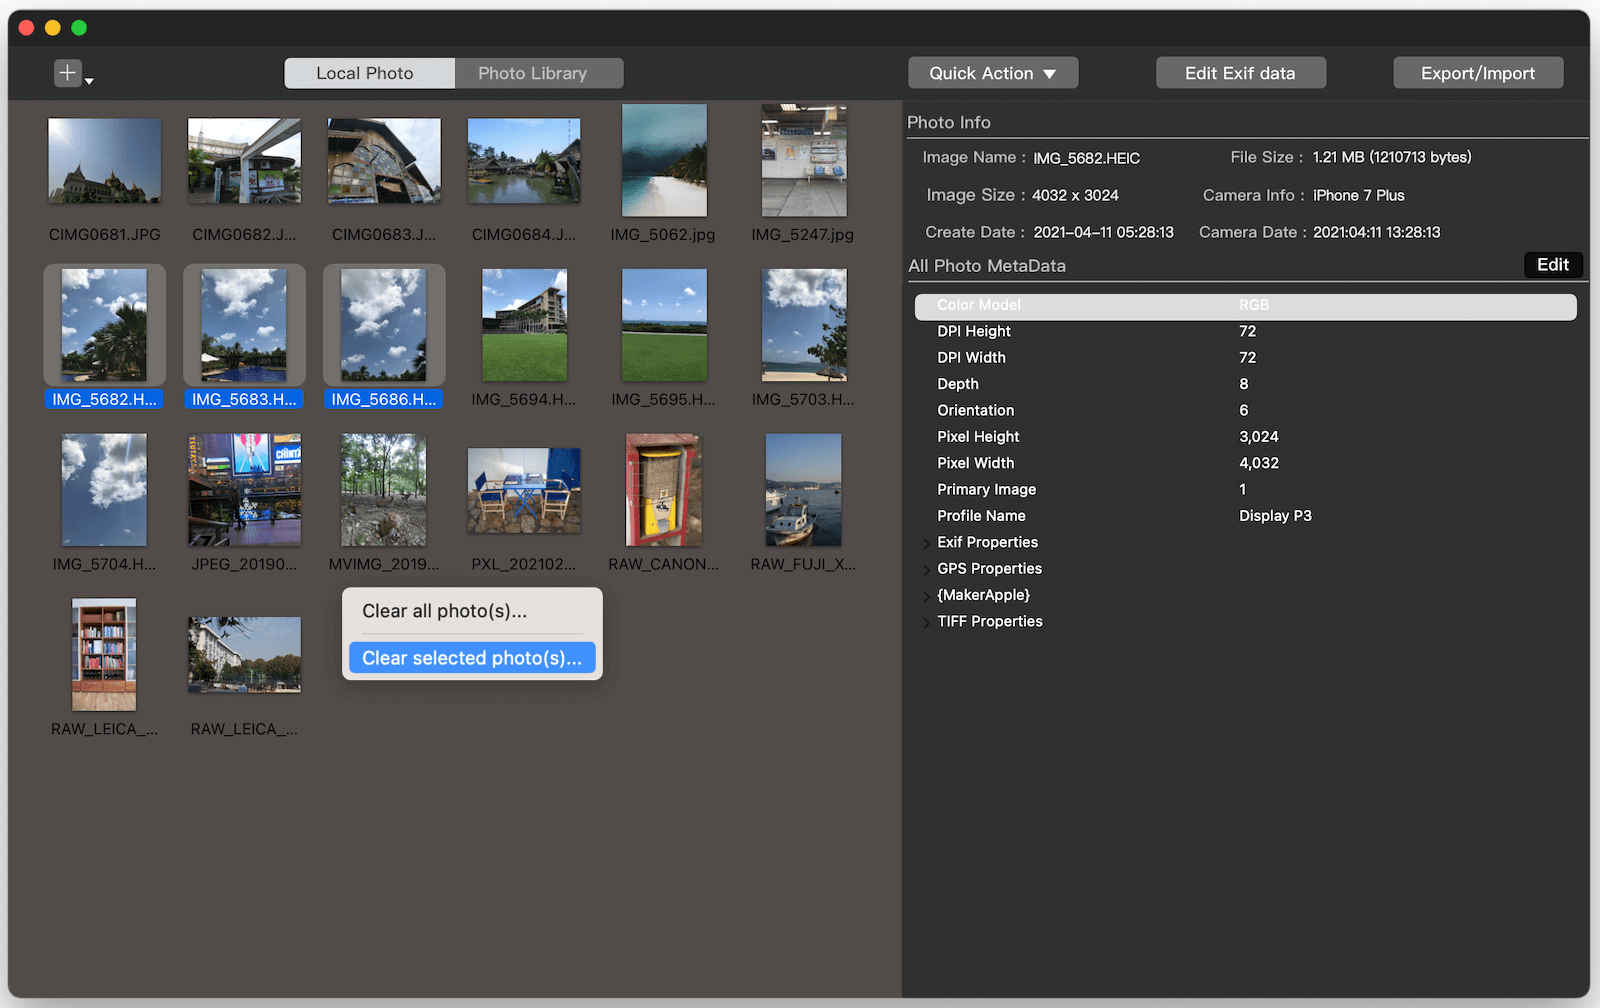
Part 9: Clear the photos on the left for the new start
When you have completed all operations for the imported photos, and you can clear the imported photos on the left for the next new start. Right click the left view, choose Clear all photos...
Part 10: Show original photos of photo library in Finder
Before the macOS Catalina, we can find the original photo in master under the photo library by file name. But in macOS Catalina and later, photos use udid as the file name in the photo library under the home folder, it is not the real file name, we can't find the original photo directly in Finder through the file name. Run Photo Exifer -> click Photo Library -> select a photo and click Quick Action -> Show original photo(s) in Finder, it will find the original photos of photo library in Finder.

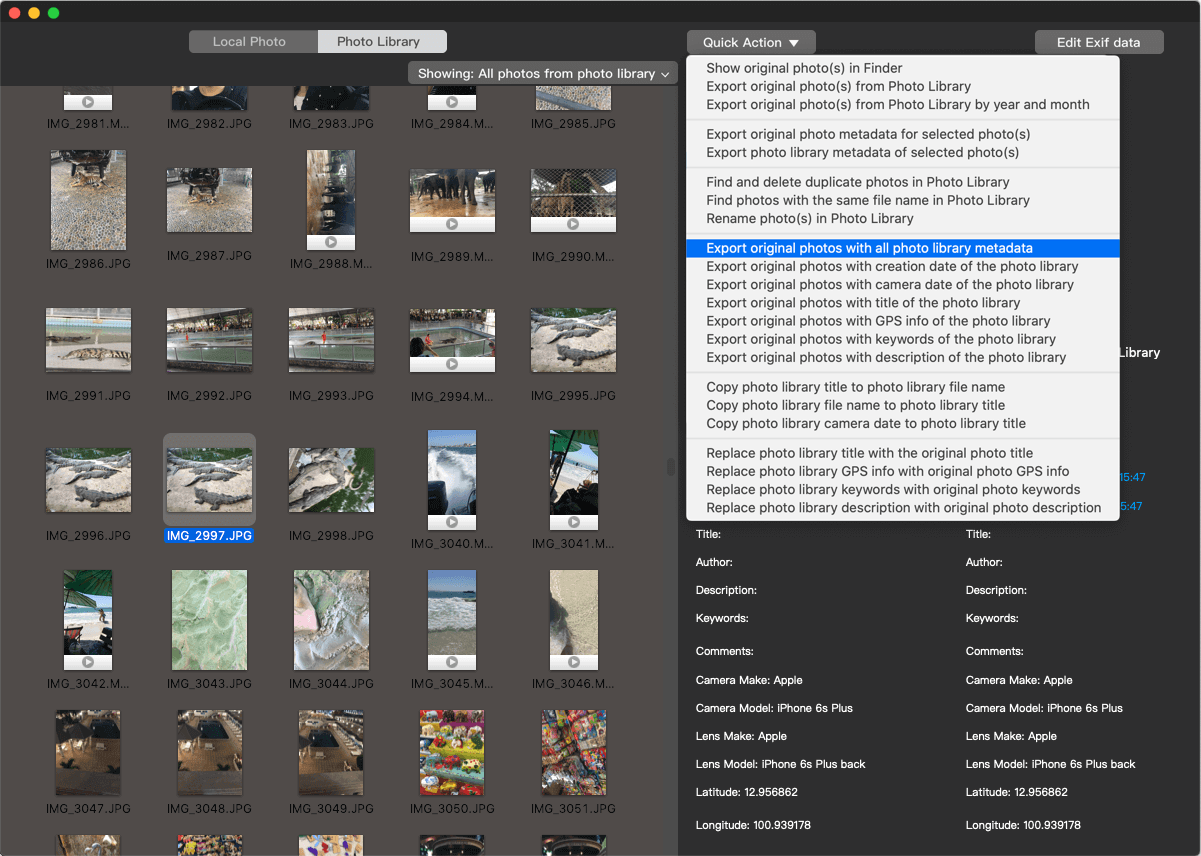
Part 11: Export photos from photo library with photo metadata
As we known that photo library uses its own database to store all photo metadata, when we changed photo metadata for some photos in the Photos application, it only changes the metadata in the database and will not save the photo metadata to the original photo.
If you need to export photos with the photo metadata in photo library, run Photo Exifer -> click Photo Library -> select some photos -> click Quick Action -> click the “Export original photos with all photo library metadata” menu item to use all photo library metadata, or you can use some photo gallery metadata tag(s), “Export original photos with creation date of the photo library”, “Export original photos with camera date of the photo library”, “Export original photos with title of the photo library”, “Export original photos with GPS info of the photo library”, “Export original photos with keywords of the photo library”, “Export original photos with description of the photo library”
Part 12: Export photo metadata of photos in photo library
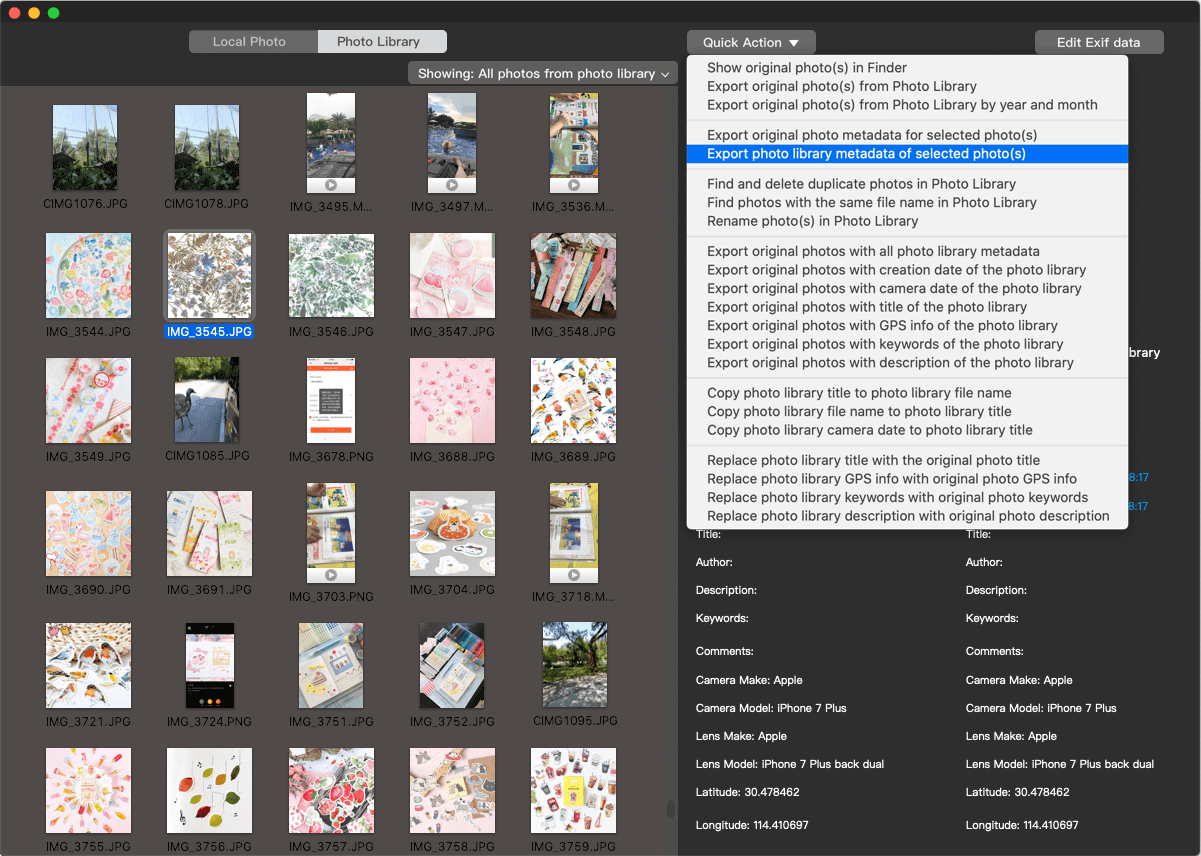
Photo metadata contains lots of information about the associated file, such as file tile, file description, author, copyright, keyword, GPS info, camera info and more. These photo metadata can help you further edit them in other software or platforms. Select photos in Photo Exifer -> Photo Library -> click Quick Action -> click the “Export original photo metadata for selected photo(s)” menu item, and “Export photo library metadata of selected photo(s)” menu item
Part 13: How to Edit photo metadata in Photo Library?
When you select a photo in Photo Exifer, it will list the photo metadata of original photos, and photo metadata from photo library on the right window, it will mark the different metadata tags between them.
And Photo Exifer provides the Edit Exif data feature to edit the photo metadata of original photos and photo metadata from photo library. Click the Edit Exif data button in Photo Library mode, it will show the menu items: edit exif data of original photo and edit exif data in photo library.
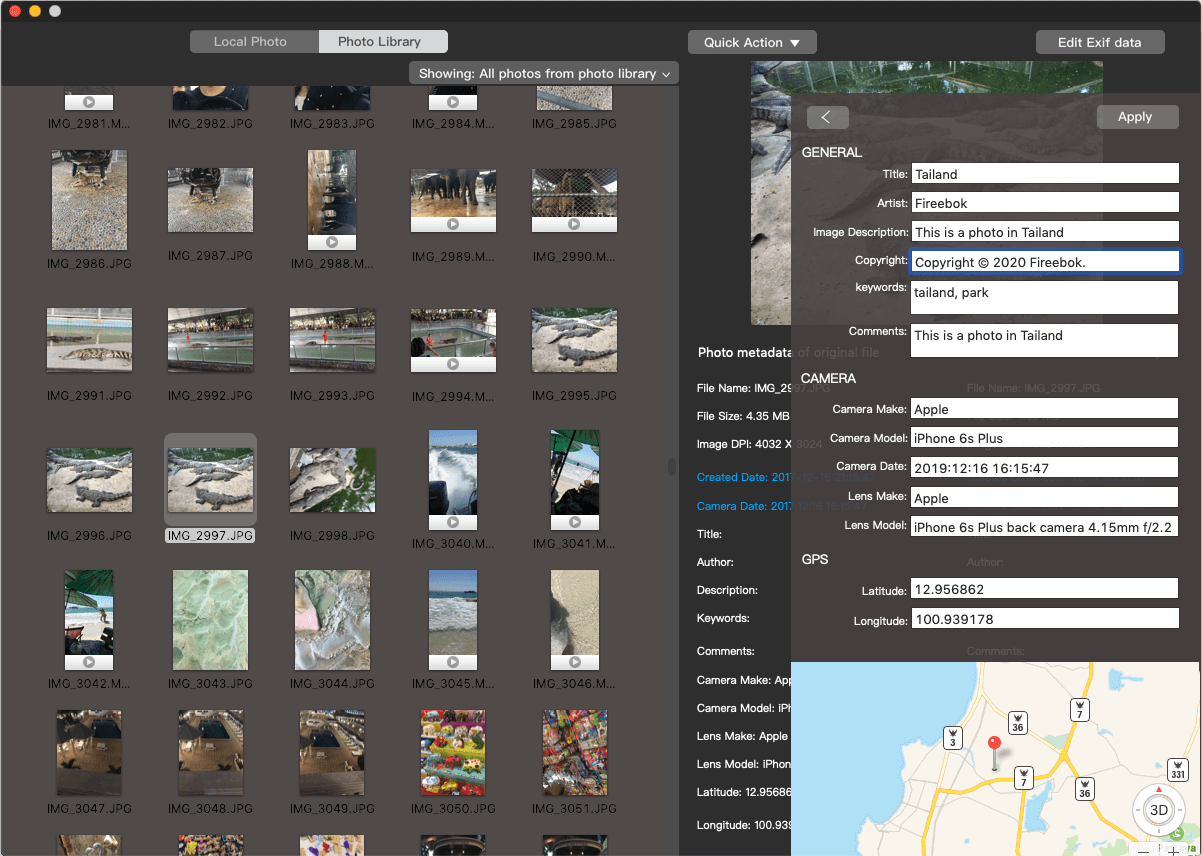
Change the value of metadata tags, and click Apply button to save changes.
Part 14: Quickly change photo metadata in Photo Library in bulk
Photo metadata in Photo Library is stored in the Photo Library database and appears in the Photos application. When you select a photo in Photos, click the info button or right click - Get Info, it will pop-up a window contains the photo metadata information in photo library. In addition to the editing features above, Photo Exifer provide some features to copy photo metadata tags to photo metadata tag(s) in photo library.
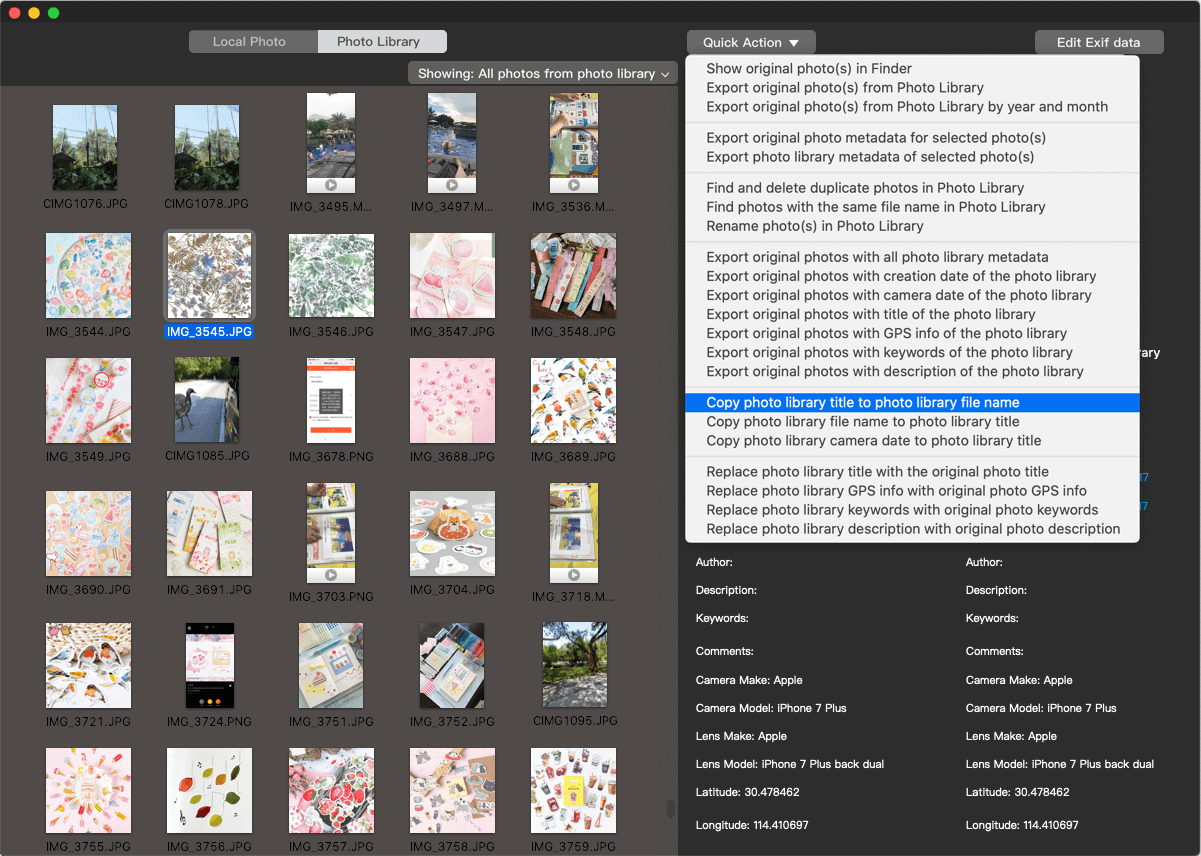
Select photos in Photo Exifer -> Photo Library -> click Quick Action -> click the “Copy photo library title to photo library file name”, “Copy photo library file name to photo library title”, or “Copy photo library camera date to photo library title” menu item.
Or copying the photo metadata of original photo to photo metadata tag(s) in photo library, click Quick Action -> click the “Replace photo library title with the original photo title”, “Replace photo library GPS info with the original photo GPS info”, “Replace photo library keywords with the original photo keywords”, or “Replace photo library description with original photo description” menu item.
Part 15: How to find and remove duplicate photos from Photo Library?
Photo Exifer supports find and delete duplicate photos and videos from Photo Library without destroying any photo library structure and database. It finds almost all duplicate photos by metadata comparison, MD5 and photo content comparison.
Select photos in Photo Exifer -> Photo Library -> click Quick Action -> click the “Find and remove duplicate photos in Photo library ”
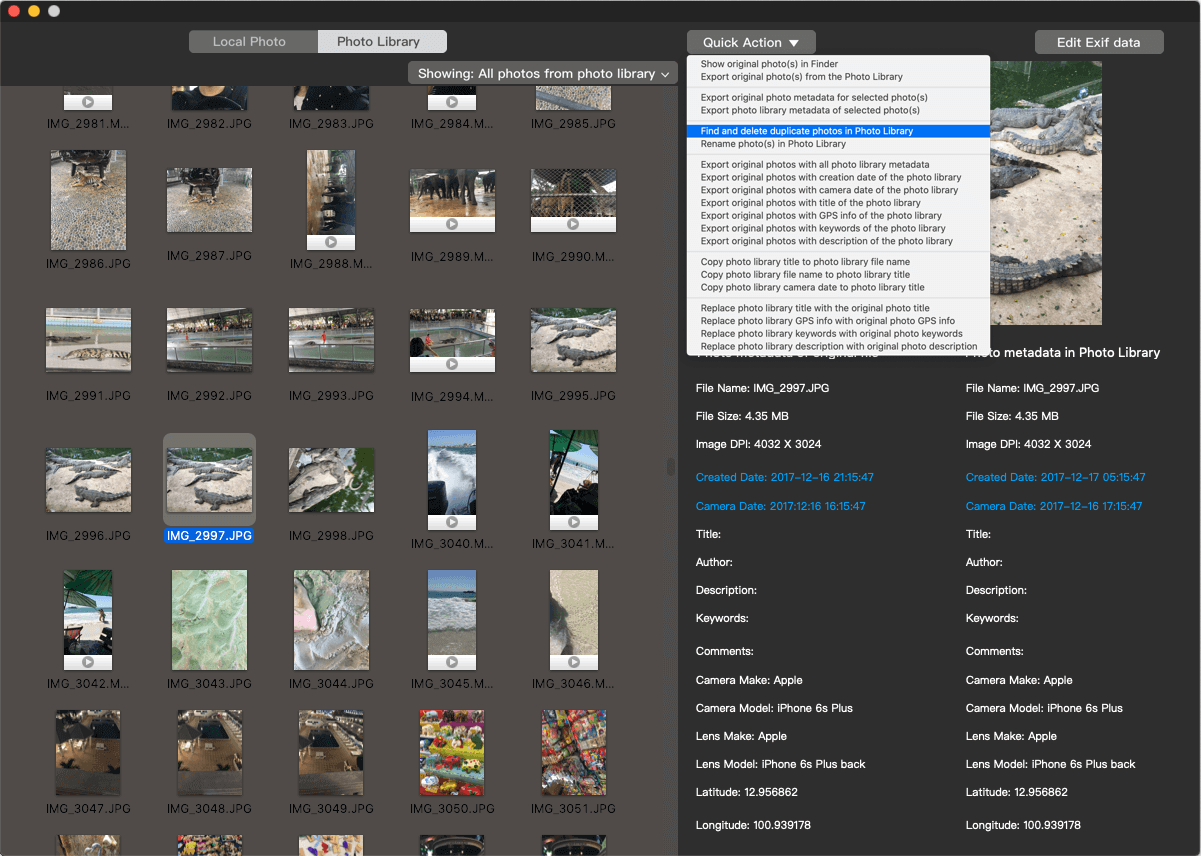
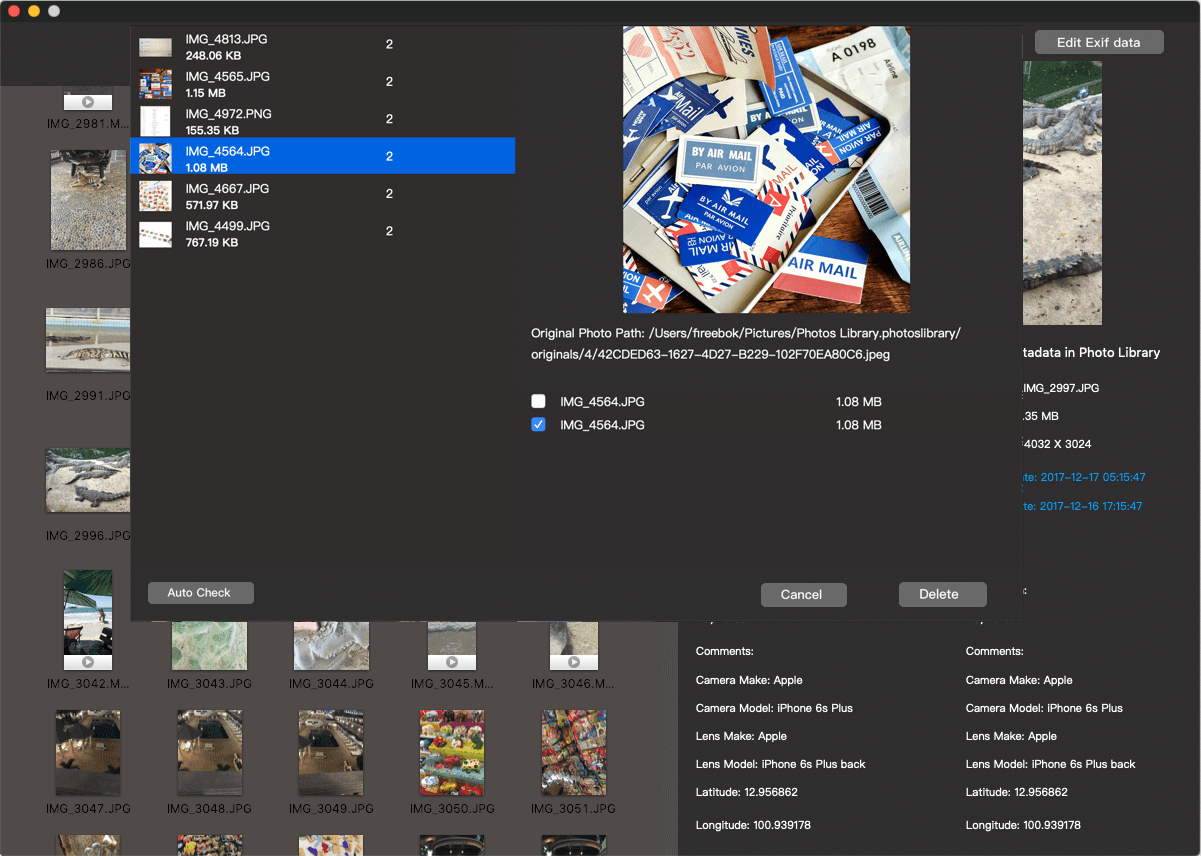
Once it scans duplicate photos, they will be displayed in the pop-up window, and you can view the original photo and photo full path in Finder. After all duplicate photos has been found, click the Auto Check button to automatically select duplicate photos to remove, or you can manually click the check box to select duplicate photosm, and then click the Delete button to remove.
Part 16: How to rebuild links to referenced files in Photo Library?
When we moved and renamed some of the original photos in the Finder, if they were related to referenced files in the Photos library, and the Photos app will not Show Referenced Files in Finder. Photo Exifer provides two ways to fix it, by changing the filename and location of these reference files in the photo library, it will help the Photos app to rebuild the links to these reference files.
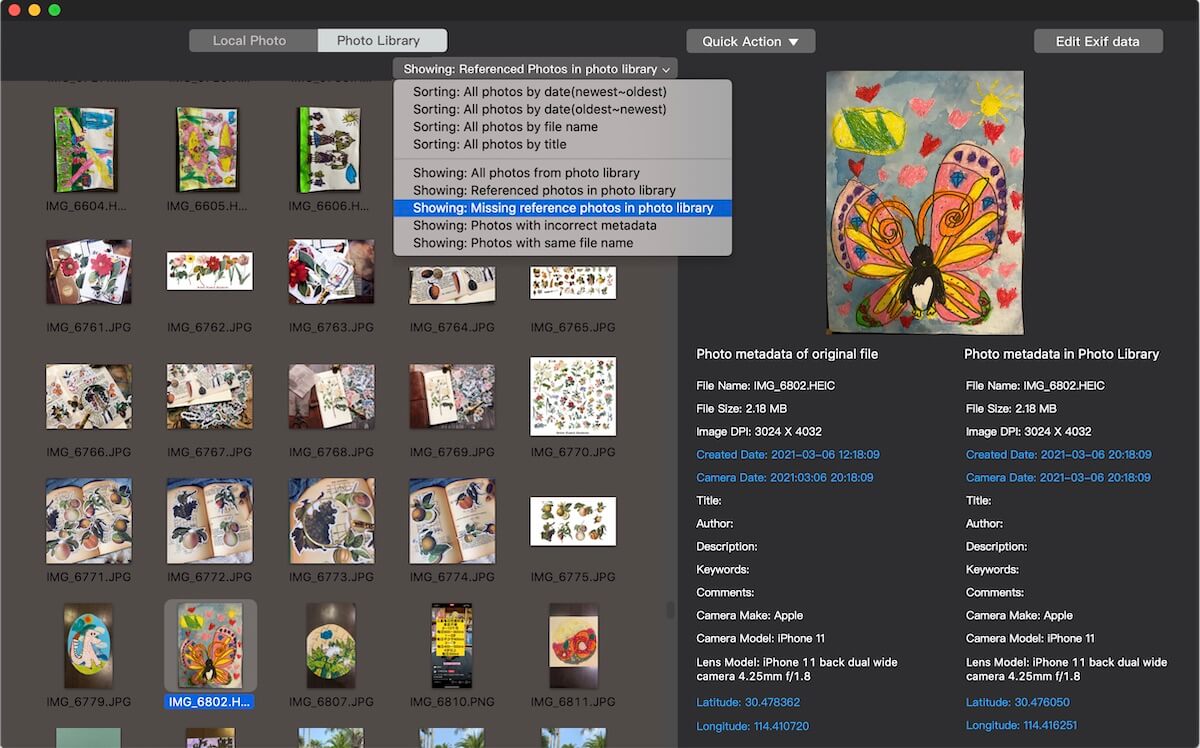
Run Photo Exifer app -> Photo Library -> click the filter option: “Showing: Missing referenced photos in photo library”
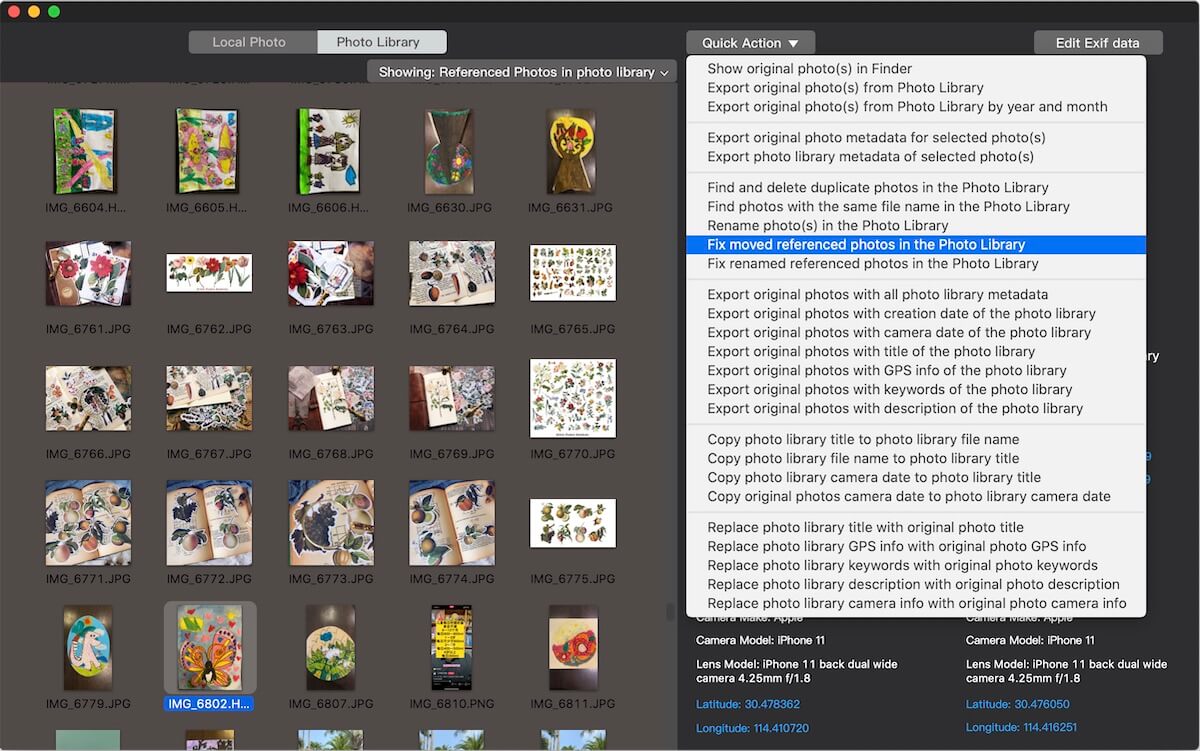
Select lost referenced photos, and click Quick Action -> “Fix moved referenced photos in photo library” menu item( if you can’t find referenced files because the original photos has been moved). Or click Quick Action -> “Fix the file name issue of referenced photos in photo library” menu item ( if you can’t find referenced files because the original photos has been renamed).
Have more questions or need help from us?
Contact our support team here.